Showing posts with label Hot Cocoa. Show all posts

Wednesday, 11 July 2018

Layered Background Artist Trading Coins

Hi Everyone Mike here!

Today it's my turn to share with you a quick and fun little project creating some "on trend" artist trading coins with a multilayered paint background!

These cute miniature works of art are just 2.5" in diameter - such a fun way to practice your art techniques!

As per usual I have recorded my entire process on video for you to watch if you feel so inclined! To watch simply click the YouTube link below.

IndigoBlu products used in this project are as follows:
Duck Egg Acrylic Paint


Wednesday, 11 April 2018

Mixed Media Art Journal Page Inspiration with Mike Deakin

Hi Everyone,

It's my turn to share some inspiration with you today and I thought I'd create a whimsical mixed media art journal page using the new Collectors Edition No15 Stamp "Dorking Hen" and a few other fab IndigoBlu products (listed below)

When I saw the Dorking Hen I immediately thought of at least 6 ways to use the stamp, but all tongue in cheek!

Here's just one of them.


To watch a video on how I created the art journal page above, simply click the YouTube link below:

Here's a list of all the IndigoBlu products used in this projects
Watercolour Card Stock

Whatever you do today, make sure it's a creative one!


Sunday, 11 February 2018

New Stamp Release Sneaky Peek with Mike Deakin

Hi everyone Mike here again,

It's a privilege for my February Design Team inspiration to bring you a sneaky peek of three new stamp sets coming soon from IndigoBlu.

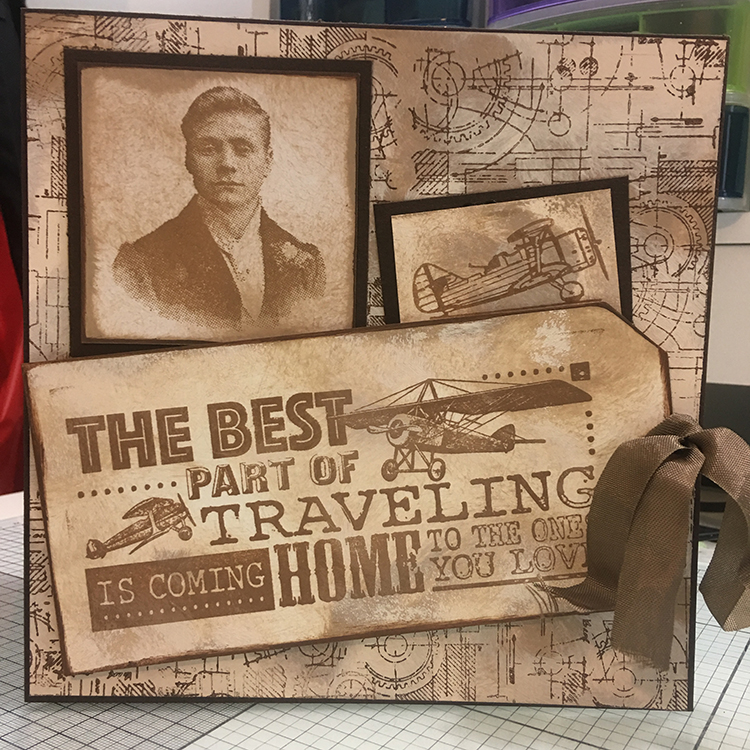
The 7" x7" card below was created using three existing neutral paints and three fantastic brand new stamp sets!


The three paint colours I used were:


I started off with my background and some small pieces of Phat Foam, loading up the paint into the foam with my spatula.
I then added the paint to my background cardstock with the foam to get the mottled effect - it almost looks like clouds (if you squint a bit that is!!).
Next using the Blueprint stamp from the brand new Draughtsman Stamp Set - I inked up the stamp, using Hot Cocoa paint instead of ink and then stamped all over the mottled sky.

I love the effect it gives! Next, I took a small piece of cardstock approx 2/12 inches by 2/12 inches and did the same thing with the background except I didn't use the Blueprint stamp. Instead, I used the new Victorian Gentleman stamp from the same set and some Coffee Archival Ink and stamped the image onto the small piece of cardstock. 

Doesn't he look just like a photograph! It's magic!!
I then matted this onto a piece of the same cardstock as my 7x7 base card. 

I then did the same thing with one of the Aeroplane stamps from the new "Fly High" stamp set.
Next, I did the same thing with one of the tags from my Junk & Disorderly art journal to create the same effect on the background. The Phat Foam was still juicy and hadn't yet dried up!
Finishing off with one of the typography stamp sets from the brand new "Traveling Home" stamp set with the same Coffee Archival Ink.
To finish off ,I glued the background onto my card base, then glued the Victorian gentleman and aeroplane piece onto the background...

...then mounted the tag with some double-sided foam tape for a bit of dimension - after adding a piece of coffee coloured seam binding to the tag! - Job Done!

I hope you enjoyed this sneak peek at some of the fantastic brand new stamps sets that will soon be available to purchase from IndigoBlu.


Sunday, 26 March 2017

Spring Tag


It is Cec here and today I am bringing you a spring tag that I created.


I am very, very fortunate that my husband has a laser cutter in the basement (it was his retirement present to himself) so he can cut me pretty well anything I want.  I don't like that normal manilla tags warp when you add lots of wet media so I got him to cut me a 4" x 8" tag from mat board.  The first thing I did to it was give it a border with Hot Cocoa Acrylic Paint because I intended to add a second layer.


I also had my husband cut a second tag from heavy card stock that was 1/4" smaller all the way around to use as a second layer.  I used some texture paste and the IndigoBlu Texture stencil to add some dimension.


Next I used some Slap it On Matte to add a few clusters of seed beads that I picked up from the dollar store.


I used some Martha Stewart Crafter's Clay and a Prima Mold to make a florish.  When it was dry I cut it in half and added it to my top layer using Super Thick Slap it On to ensure that it would not fall off.


I added a coat of Gee-Sso Good White gesso over the top of this layer and then sponged on Townhouse Teal, Coastal Walk and Hot Cocoa Acrylic Paint.  it was brighter than I wanted so I sponged a bit of the gesso on over the paint to knock it back a bit.


Then I decided to add a few spray inks - Tim Holtz Gathered Twigs and Lindy's Frozen Jack Frost but it didn't turn out as I expected.  I have a love/hate relationship with spray bottles and usually they won't spray when I want them to but this time the Tim Holtz bottle sprayed way too much.  I grumbled a bit and then started sponging the paint colours back over all the brown.  I also stamped some script from the IndigoBlu Tasty Textures set with some Coffee Archival Ink.


Next I used the Coffee Archival Ink to stamp a couple of flowers from the Live, Laugh, Love set on pale yellow card stock, fussy cut them and shaped them with a large embossing tool.  I used a sponge to add some gesso to the edges of the flowers and then mounted one on top of the other.


I also used a punch from EK Success to punch a bunch of little flowers from some of the 12" x 12" Damaged Dots paper.  I went back and cut a batch of even smaller flowers just to mix things up a bit.  Then I shaped them and added a bit of gesso to the edges.  When you see these little flowers on the finished tag take note of how well the blue and teal paints match the Damaged Dots paper.

To finish the tag, I added some twine at the top and pearl stickers to the centre of all the smaller flowers.  I watered down some of the gesso and flicked it on with an old brush.  Then I thought it needed something else and my husband actually suggested the feathers.  Usually he just rolls his eyes and shrugs his shoulders when I ask for his opinion so needless to say, I was happy that he had something to say this time.

I love this tag and hope I have inspired you to dig out your papers and paints and create.  Happy Spring!

Thursday, 23 February 2017

Love canvas

Hi! Solange Marques here again! I'll share with you the project for this month!
February is Valentine's month, then The month theme is LOVE!!!!!

I've created a canvas:

I've used a Square Flat Canvas and I applied modelling paste on the Believe stencil. Then I applied
English Cottage Artist's Acrylic paint Hot Cocoa and GeeSso Good!Gesso-white on the background and I've painted a heart with Postbox Red and Mulberry Bush:


I've used Word Blocks stamp:


I hope you enjoy it!

Wednesday, 16 November 2016

Family Canvas

Hello and welcome, Kay M here to share the canvas I made for this month's seasonal theme of bonfires and fireworks.   

November has a few annual family gatherings involving food, bonfires and fireworks and where there's a gathering there's the group photo!   I've used one from the  Lost Family paper stack as the main image.


A 20cm x 25cm canvas was painted with Gee-Sso-Good black, when dry,  a Sleeping Beauty wash was painted over and more black sponged around the edges to frame the canvas.

Unicorn Sparkles was mixed with Super Thick Slap-It-On and used through the Starburst Stencil three times on the canvas and left to dry.   Pink Luscious was then added to the mixture and this was used through the Weird Science Stencil into the centre of the Starbursts.  This same mix was watered down and splattered over the canvas,  when dry,  white paint splatters and lines were added.


The elements were prepared. 
I used fine texture paste through the Laurel stencil and fussy cut them out when dry, they were painted with a Emerald City and Pheasant Bronze mix and then dusted with Gold Luscious.   Wooden sentiments were painted with Gee-Sso-Good black then dry brushed with Vodka Martini and a little Hot Cocoa and backed with white card.   The family were fussy cut and a black pen run over the cut edges. 


To finish, the family group was attached with silicon glue and the laurel leaves adhered horizontally behind and in front of them.  The sentiments placed as shown.

I love how the Unicorn Sparkles work with the Starburst stencil to look like an exploding firework.  I do hope you have enjoyed this canvas.

Take care until next time,  Kay M x

Saturday, 22 October 2016

Introducing Guest Designer and our new Brand Ambassador Linda Simpson


It's "Time" to introduce a Guest Designer and new Indigoblu Brand Ambassador Linda Simpson.

Linda is based in the UK and loves all types of crafting from crochet to mixed media and steampunk. Today she is sharing a project using one of the IndigoBlu Small Clock Kits.


Using the small Clock kit and an MDF fob watch I painted a coat of Gesso over them both.  Once this was dry I mixed IndigoBlu acrylic paint Hot Cocoa with Gesso and again covered both MDF pieces.
 
 
Using one of the papers from the clock kit I adhered to the clock face and covered with a coat of Mod Podge. I stamped IndigoBlu Mechanics with Versafine vintage sepia.  Once this was dry I then dusted Luscious Powder Orange which adhered to the stamped image.


The fob watch outline I covered with a combination of Lemon Meringue and Burning Bonfire Acrylic Paint with a baby wipe as this gave it some texture.  To give it a rustic feel I then dabbed on with again a baby wipe metallic acrylic paint Pheasant Bronze.


Once the paint was dry I then added FlitterGlu to a foam pad and dabbed around the edge of the fob watch.  I then stamped the Mechanics stamp around the edge with Stazon.
 

Next was to add the numbers to the clock face. I did this by using the stencil which came with the kit, I mixed Super Thick Slap it on and Acrylic Metallic Paint Goldfinger.


Once everything was dry on both pieces I then adhered the clock face to the front of the fob watch outline.
 
 
The last item to attach to the project was the clock hands which came with the kit.  


Happy Crafting
Linda x