Tuesday, 30 May 2017

Altered Composition Book Butterfly Collage using IndigoBlu Flutterby and Crackleglaze

Welcome IndigoBlu fans! We have some fantastic news for all those fans of rubber stamping in the US who love IndigoBlu stamps (or are maybe new to them?)


Topflight Stamps, LLC is a new Art Stamp Online Store. They are a US based company that carries Rubber and Clear Stamps from different countries around the world. Check them out for unique international stamps, including IndigoBlu. All US orders over $50 ship free.

We thought we'd share some inspiration, first seen back in April 2017, from US based designer and International Design Team Member Autumn Clark. She cleverly combined the Dinkie Flutterby and CrackleGlaze Background stamps to alter the cover of a composition book.


Autumn with you today to share some very fun techniques. My jaw dropped to the floor when I saw THIS post by our Jenny Marples. Right away I ordered the Crackleglaze Background stamp.


I first tried to make a floral design like Jenny. I inked the background and colored the poppy from the Poppycock stamp set with Distress Inks. Next I layered on Super Thick Slap it On with a palette knife. I pressed the crackle stamp into the paste and quickly washed my stamp and let the panel dry. I went over with Distress Crayons blending with a baby wipe. I thought I would add some chunky embossing to the edges to mimic solder. Hmm, at this point I felt the entire project had grown rather dismal... So I cut a square out of the middle and decided to salvage the piece as a frame.


I inked some book page and card with Distress Oxide ink. I cut the circle dies from the inky card. I smooshed some card into Postbox Red paint and then dipped it into Distress Oxide, letting the ink flow down. I stamped the Flutterby stamp onto that panel then used the excess to cut a postage die. I used all of these elements to build my composition.


Here's a closeup shot of that lovely crackle effect.


I layered the butterfly over a purchased paper flower and bundled string.


All of the layers were raised with chipboard.


I added some staples for interest.


I curled the butterfly wings for even more dimension.


I glued a vintage button to a brad to adhere a second paper flower and layered over a die cut flower.


Here it is ready for my journaling and doodles. I hope you have fun experimenting with these techniques.


And here's some more inspiration from Autumn using the Dinkie Flutterby stamp;


Thank you for joining us here at the IndigoBlu blog to see Autumn's gorgeous projects - we are sure you'll now have some ideas of your own for using the Dinkie Flutterby and CrackleGlaze Background stamps, both of which are now available in the US from Topflight Stamps.

Saturday, 27 May 2017

Video Tutorial: A Romantic Mini Embroidery Hoop

Hello to everyone, Giovanna here and today I am here to show you how to transform an humble wooden embroidery hoop in a piece of art.


https://www.youtube.com/watch?v=Sr2v2Rd7cb4&t=330s

You can use this technique on any size of embroidery hoop with any old doilies.


Materials I used:

IndigoBlu Slap It On - Super ThickGeeSso Good! Gesso - White 120ml Live Laugh Love A5 Red Rubber StampFaber Castell Gelatos - 6 different set options (shipping from 1st November)Luscious Pigment Powders - 25ml (13 colour options)Floral Fantasy A5 Red Rubber Stamp - by Kay Halliwell-Sutton


Friday, 26 May 2017

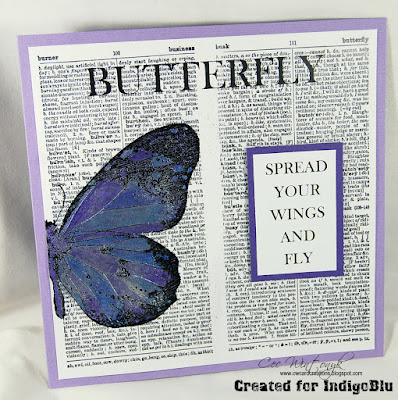
Dictionary Butterfly


It is Cec here and today I am bringing you a clean and simple card that I am calling Dictionary Butterfly.


I started by scanning the page in a dictionary that had the definition for Butterfly on it - look closely and you can see it down on the bottom right.  I inserted the image into a new document in Word  and scaled it to the size I wanted to cut it for my background (Click on the image and then on Format to get the size so you can change if desired).  Next I added the Butterfly text at the top making sure that my image was centred on the page first.  This is simple to do by making sure that the image is behind text (Right Click on Image after you insert it then click Wrap Text then click Behind Text).


The next step was to stamp one half of the Big Butterfly with Versamark and then emboss it with Ebony embossing powder.


I painted the butterfly using some IndigoBlu Metallic paints - Kingfisher Blue, Aladdin and Sleeping Beauty.  Then I took a fluffy brush and went over the whole butterfly with Silver Luscious powder.  This not only added wonderful shimmer to the butterfly but served to make the colours look a little more blended.

I adhered the panel to my card blank and then created a computer generated sentiment that I mounted on some purple card stock and added to the card with dimensional foam strips.

There you have my easy, peasy card.  I hope this inspires you to create with some of the wonderful metallic paints from IndigoBlu.

Thursday, 25 May 2017

Love Is The Honey...

Hello Everyone and Welcome!

Today Ksenija is here, and I am happy to share with you a new project as a part of May inspiration from International DT.
I am featuring Victorian Garden in combination with Megaflakes. This set will be released soon and is available now for pre-order at IndigoBlu online store.
I started with stamping down a beautiful quote from Victor Hugo and a grass silhouette in black archival ink directly to a card base.
Then die cut a square from a piece of card stock and blended in a mix of Distress inks to create ombre effect from bright yellow to dark green.
Using FlitterGlu stamped down the grass to the square panel a bit off the edge and covered the impression with Chariot of Fire Megaflakes. These Megaflakes come in a pure bright gold shade and stand out beautifully on a green-blue background.
Finally stamped down a bee from the same stamp set in black archival ink and mounted the square to the card base using foamed tape.
Thanks so much for stopping by! I hope, you enjoy this Summer card and you will take a look at the new release of IndigoBlu stamps.

IndigoBlu Supplies Used:

Tuesday, 23 May 2017

Wings of Freedom

Hello everyone! It's Solange Marques here!
Today I'll share with you a new project using the wonderful IndigoBlu products!
This month the theme is about wings. I love this theme!!!
I've made an altered clipboard:

I've covered the clipboard with IndigoBlu European Grand Tour Mixed Media Paper Pad 12x12 :


Then I've applied flitterglu and Lancashire Rose Megaflake  on the clip.


After, I've used the stamps: IndigoBlu Ledger Background and Script Bakcground:

I've applied black embossing powder on IndigoBlu Big Butterfly:


I've applied Luscious Pigment Powders: Gold and Copper:


Finally I added some alpha chipboards:


Monday, 22 May 2017

Victorian Garden Shadow Box


Today we are joined by one of our Brand Embassadors, Linda Simpson who has created a beautiful shadow box project for you.

1. Using Slap it on and the faded dots stencil I stencilled around the outer frame of the shadow box. Once this was dry I then painted all over using GeeSOO Good in Black. Once this was all dry I then used Gelatos Metallic Mint.


2. On Bockingford water colour card I stamped the Dinky Butterfly and sentiment from Victorian Garden stamp set with black Versafine and embossed with clear embossing powder. I then cut them out and coloured with Green and Gold Luscious Powders.


3. I then adhered a piece of Bockingford watercolour card to a piece of cardboard. I then proceeded to cover the top half with Gelatos Cotton Candy, sprayed water on and painted into the card. I then used the Pistachio for the bottom.  Once this was dry I used the stamps from the Victorian Garden to create a garden scene. I painted the bumble bees with gold Luscious powder.  Once this was all dry I then adhered to the inside of the box with Slap it on.
4. To finish off I added the butterfly and sentiment to the outside of the box.


To see the whole picture follow the link to Linda's YouTube, where you will find the full tutorial.

The link to the video is https://youtu.be/f5F8DKglKVA 

Saturday, 20 May 2017

Inspiration from International Design Team Members Ksenija, Cec and Giovanna

Today we are sharing inspiration from Ksenija, Cec and Giovanna. For the full tutorial head over to their blogs via the link.