Tuesday, 27 December 2016

Tutorial: Steampunkesque Calendar

Hello Giovanna here, with a huge upcycling project to celebrate the upcoming 2017. I've found this large wooden panel at work, and I've thought it was perfect to turn it out in a calendar. I envisioned it with lots of embellishments and texture, but then I realized how beautiful the Steampunkesque papers were and I decided to let it flat and simple. I really like it!

You can make something similar, even out of heavy cardstock, here the step by step:

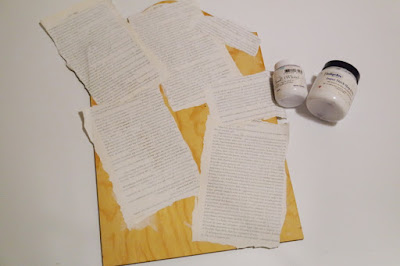
Glue down some gessoed book pages to the wooden panel using Slap It On, or Super Thick Slap It On spreading it with a soft paintbrush.
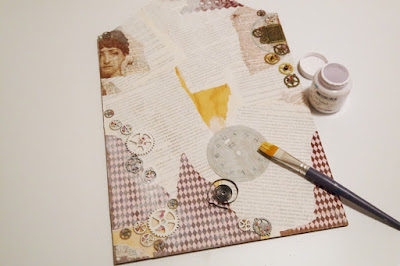
Tear some pieces of paper from the Steampunkesque paper pad and adhere them also to the panel.
Glue down the heavy embellishments with the Super Thick Slap It On using a palette knife. Let it dry thoroughly; gesso everything and set aside to dry.
Stamp on gessoed book page the steampunk lady.
Color it with Gelatos using a detailed waterbrush and embellished it with bits of lace.
Print the calendar, and stamp randomly over the panel and on the calendar. Attach the calendar with a bulldog clip.

Products I used:

IndigoBlu Slap It On - Super ThickGeeSso Good! Gesso - White 120ml Faber Castell Gelatos - 6 different set options (shipping from 1st November)Luscious Pigment Powders - 25ml (13 colour options)Steampunkesque A5 Red Rubber Stamp - by Kay Halliwell-SuttonTeeny Background A6 Red Rubber Stamp by Kay Halliwell-SuttonLedger Background A6 Red Rubber Stamp by IndigobluSteampunkesque - Mixed Media Paper Pad - 6x6, 24 sheets, 190gsm

And from me and all the team, thank you for being so supportive and generous this 2016, we'll see in 2017!


Monday, 26 December 2016

My Heart Soars


It is Cec here and I have another inspiration piece for you.  Count Your Blessings is the theme this month for the International Design Team and when I think of my blessings my heart gives a little flip so I decided to make a little canvas to portray how this affects me.


I started with an 8" x 8" canvas and gave it a coat of White Gee-Sso Good Gesso.  Next I put some Super Thick Slap it On through a Script stencil.  Once it was dry I gave it another coat of gesso because I didn't want it to be shiny.


I coated a piece of fine corrugated cardboard with Black Gee-Sso Good Gesso and when it was dry gave it a coat of Matte Slap it On.


Next I cut a piece from a Tyvek envelope and painted it with Raven Black Metallic paint.  When it was dry I stamped it with the English Flourish (Dinkie) and the dots from the Tasty Textures stamp set using Jet Black Archival Ink.  Then I heated it between two pieces of parchment paper with the painted side down and being sure to just hover my dry iron over it and not touch it.  It takes a bit of patience but you get the coolest bubbles and holes that you can see in the photo of the finished project.


Next I coated a wooden heart that my husband made for me with some Golden Course Pumice Gel and when it was dry I painted it with Ruby Slippers Metallic paint.


I stamped the Flutterby (Dinkie) on some white card stock with Black Gee-Sso Good Gesso and then cut it in half and removed the head and bottom of the body.  The next step was to paint it with Ruby Slippers and Vodka Martini Metallic paints and then attach it to the back of the heart.


I altered the colour of a filigree piece with some Pitch Black and Silver Mixative Alcohol Inks blended together.  This was then attached to the heart.

To finish the canvas I used a dry brush to paint Raven Black Metallic paint and then some White Gee-Sso Good Gesso outwards from the centre.  I added the corrugated cardboard next, followed by the Tyvek panel.

The heart was mounted on a little bit of cheesecloth, On top of the cardboard I added a little strip of faux metal from my stash that was painted with Black Gee-Sso Good Gesso and heat dried to create bubbles.  Finally I created the sentiment on the computer, tore around it and inked it with some Hickory Smoke Distress Ink.  Tip:  The best adhesive for ensuring that all things, light or heavy stay attached to the canvas is Super Thick Slap it On.

Thanks for stopping by and I hope I have inspired you to document your blessings in your art.

Sunday, 25 December 2016

Christmas Star

Hello Everyone and Welcome!

Today Ksenija is here, and I am happy to share with you a new project dedicated to Holidays Season.
I am featuring several IndigoBlu supplies and demonstrating how to mix Christmas themed stamps with year-round stamps. I love Amaryllis flowers during the Christmas season, I think Colour Me - Lily stamp looks very similar to Amaryllis.
I started with stamping Colour Me - Lily in black Archival ink down to a piece of white card stock and for the second tome - down to masking paper. To create a mask I fussy cut out stamen impression. Prior to masking the stamens I heat embossed black anthers with clear embossing powder three times to make them glossy and a little bit dome-shaped.
I masked out the stamens and generously covered Lily impression with Distress Ink in Candied Apple. To create a more dramatic look I blended in Distress Inks in Aged Mahogany and Blueprint Sketch to the edges. Keeping my mask in place I dropped clear water over the image and towel dried it. Having removed my mask I coloured the stamens with Distress Markers.
I covered a string of stars from Peace on Earth stamp set with FlitterGlu, stamped it down to Lily and adhered MegaFlakes in Chariot of Fire.
The final step is to create a card panel. I splattered water diluted IndigoBlu acrylic paints in GoldFinger and Hunter Green and let it air dry.
After this I inked the string of stars from Peace on Earth stamp set with dye ink in black and stamped it down to the panel. From the same set I used a text stamp and made several impressions in Aged Mahogany and Blueprint Sketch Distress Inks.
To assemble the card I glued the panel to a card base and used a foam tape to raise the square with Lily.
Thanks so much for stopping by! I hope, you enjoy this card and will try to mix Christmas stamps with year-round images.

I am wishing you peace, love and joy at Christmas and always!

IndigoBlu Supplies Used:
Colour Me Lily
Peace on Earth
FlitterGlu
Chariot of Fire
English Cottage Artist's Acrylic Paint - Hunter Green
Artist's Acrylic Paint - GoldFinger

Friday, 23 December 2016

I'm grateful for nature

Hello everyone! It's Solange Marques here. The month's theme is "Count your Blessings".
The end of the year is a great moment to reflect about our blessings.
I can think on a lot of blessings, but , to make this project I chose to thank about the nature.


I applied IndigoBlu GeeSso Good! Gesso-white on the shadow box and I also applied some glimmer sprays.


Then I used several stamps: IndigoBlu Robin A6 rubber stamp , IndigoBlu Floral Fantasy A5 rubber stamp, IndigoBlu Peony Dinkie A7 Rubber Stamp, IndigoBlu Blooming Great A5 rubber stamp .
I painted them using IndigoBlu English Cottage Artist's Acrylic paint Lime Marmelade, Burn Bonfire and Postbox Red.


I added cut outs from Floral Fantasy mixed media paper pad A6 and some resin pieces on the shadow box:


Wednesday, 21 December 2016

December Challenge - Snow Snow Snow

Good morning,

Well here it is, the last challenge of 2016.  First we have the important task of announcing the winner of last month's challenge, Sparkle & Glisten.

Our random winner is:

Congratulations Craft Away, we will be in touch shortly to arrange your prize.

And our Top 3 as chosen by the DT are:

1. No. 11 - Shelagh's Crafty Concepts
2. No. 9 - Lyn Marlow
3. No. 4 - Carolyn's Creations

Congratulations all, we will contact you shortly to discuss a Guest spot!

This month's theme is 'Snow, Snow, Snow' and here is our lovely winner from last month, Chris, with her inspiration piece for you.


Chris said:


I was incredibly lucky to have won the 'Monochrome' challenge and not only have I won some awesome stamps, I also get the chance to be a Guest Designer - thank you so much IndigoBlu!.  As the theme is 'Snow, Snow, Snow, I went for Christmas and used the truly fabulous Bare Forest 1 stamp which I received as part of my prize! I am honoured to be sharing my card on the IndigoBlu blog, though it's scary being showcased amongst such talented  designers!  Thank you for letting me join you! xxx
You can see Chris's full make over on here blog HERE.  Please hop across and check it out.

And our DT have made these beautiful pieces, I hope it inspires you to join in!


You can check out all the DT's work and how they made them, by clicking the link on their names.

Don't forget we have fab prizes up for grabs too, Indigoblu stamps of your choice as follows:

3 options to choose from:
1: 2 Large stamp plates (A5)
or
2: 4 Small stamp plates (A6)
or
3: 1 Large and 2 small plates

There’s also the Winner’s Badge, and one for the Top 3, to display proudly on your blog, and the WINNER of the challenge will also be invited to do a GUEST SPOT on a future Challenge Launch post. That’s right, your work will be on the Challenge Blog alongside the Design Team!


Also the Top Three each month (chosen by our lovely DT) will all be invited to do an inspiration piece to be included on the reminder post that goes live mid challenge. So, if you’d like a chance to be featured on the IndigoBlu Challenge Blog get those stamps out and get creating!

You’ll find all the information on how to enter the challenge, the rules (don’t worry, there’s not that many) and get to meet theDesign Team in the tabs on the sidebar.

All that's left is to wish you a peaceful and Happy Christmas, and Best Wishes for 2017.  Hope you can join in the challenge this month.

Warm Regards,

The IndigoBlu Challenge DT
& Winner.