Sunday, 26 November 2017

More Acrylic Pouring


Morning All, 

Carolyn here with you today and I'm sharing a video of the acrylic pour I made for Kay's recent One Day Special. Would you know this was made using the bottom of a water bottle. 

To watch how I created this canvas below click on the YouTube  link


The Acrylic Pouring Kit, I'm sure you will agree, is fun and very addictive. I hope you are enjoying using yours and please share what you make with us at IndigoBlu. Below are a few photo extracts from the video.


And a couple of close ups...


I hope you enjoy the video and will subscribe to the IndigoBlu YouTube channel to see other inspirational videos from Kay and the Design Team.

Thank you for stopping by and I look forward to sharing more inspiration using IndigoBlu products with you soon

Carolyn
xxx


Saturday, 25 November 2017

Sparkle And Glisten

Hello Everyone and Welcome!
Today Ksenija is here, and I am happy to share with you a new project as a part of November inspiration from International DT.

Today I am featuring the Vintage Flourish red rubber stamp for a flap card. One beautiful flourish helps to build a background and serves as a focal element as well.

Tips on Making This Card:

  • Trim the panel from the cream card stock down to 4 1/4 by 5 1/2" (10 by 14 cm)
  • Stamp down the flourish in linen ink several times
  • Trim the card base from white card stock down to 6 1/2 by 4 1/2" (16.6 by 11.5 cm) and score it horizontaly
  • Stamp down the flourish in light green ink. Then apply a darker shade of ink to the stamp and dub off partially ink with a paper towel and stamp down to the first impression. 
  • Cover the Flourish stamp partially with FlitterGlu and stamp over the colour impression
  • Apply Morris Dance Megaflakes and rub off the excess of foil. 
  • Stamp the sentiment from Sparkle and Glisten set in black ink
  • Adhere the card down to the base using a double-sided tape
Please share with me in comments your ideas what other IndigoBlu stamps could be used for this technique - building a background and being a focal element.
Thanks so much for stopping by. Have a nice weekend!

IndigoBlu Supplies Used:
Vintage Flourish Red Rubber Stamp
Sparkle and Glisten Red Rubber Stamps Set
Morris Dance Megaflakes
FlitterGlu

Monday, 20 November 2017

Inspiration from International Design Team Members Carolyn and Ksenija

Even more inspiration for you today from International Design Team Members Carolyn and Ksenija. To see the whole project head over to their own blogs, via the link.

Carolyn


Sunday, 19 November 2017

Inspiration from International Design Team Members Lydia, Cheremane and kayM

Today we have more inspiration from International Design Team Members Lydia, Cheremane and KayM. To check out their projects in full detail, head over to their blogs.


Saturday, 18 November 2017

Inspiration from International Design Team Members Jannet and Mike

Today we have inspiration from Jannet and Mike. For further details of their projects head over to their own blogs (via the link on the sidebar).

Jannet

Mike

Thursday, 16 November 2017

Festive Ornaments


Hello,   Kay M here today with an experiment with the acrylic pours  Kay launched on Hochanda at the weekend.  You can still watch all her shows on Rewind at the Hochanda web site.   I had so much fun making samples for the shows and learnt a lot  in the process.   The great thing about acrylic pouring you never know how it's going to turn out!  Kay's  Go-Flow and Cell-u-Like formula's take the guesswork out of measuring all the elements and work with all  the IndigoBlu paints.       

Having done a few projects on flat surfaces I thought I'll have a go on some shapes, a few paper mache  ornaments from my stash.   Sue, from the  TV design team did a couple of lovely egg shaped ones as samples for Kay's shows.  

They were painted with Gee-Sso-Good white and set up over a foil tray.  
The  paints, the new Red Hot Chilli, Purple Rain, and Teal for Two  as well as Cinderella, Black Gee-Sso-Good and Gold Luscious pigment too  were mixed in shot glasses with out adding any water.  A few drops of Cell-u-like were added to three of the paints.   I had already made up white following the instructions that come to the Go-Flow and Cell-u-Like.

Each ornament was thickly painted with the white mixture then the colours were added to the top of each ornament one on top of another and letting them drop though each other and mingle. 
  They were left to dry.    They were then given two coats of Glossy Slap-It-On mixed with a pinch of Unicorn Sparkles. 
And when dry beads and tassel's were added.  It was interesting to see how each one was different when the same paint colours were used.


There was still a fair amount of paint left so I did a dirty pour on to an A5 canvas painted with black Gee-Sso-Good using all the remaining paints, added a little water to each of them to get a good pour, and the white base.


Check in to the shared blog on the 19th November to see how it turned out!  

Until then, take care Kay M x

Monday, 13 November 2017

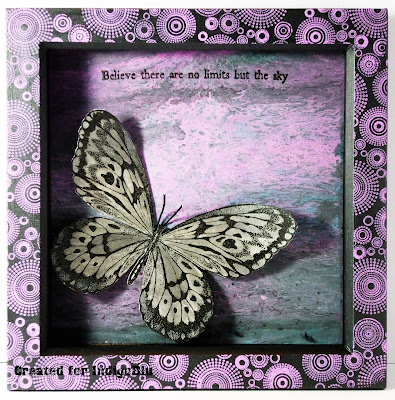
Believe there are no Limits


Hello Cheremane here with you for today's post. I was so lucky and got to play with the new Acrylic Pouring items that have just been released with Kay live on Hochanda. I'd never tried it and oh wow I had so much fun.

First I added three different paints Marshmellow,Townhouse TealRaven Black & White Geeso Good along with some water ,Go-Flow and Cell-u-Like into a plastic cup. I used a 6 x 6 piece of watercolour card which I placed on top of the cup and then turned it upside down and let the paint do the work.


You need to leave it to dry fully preferably till the next day as thats what I did I did before stamping the sentiment from Mindfulness A5 stamp set with Versafine Onyx Black and then heat embossing with clear powder. Some Pours will take longer to dry depending how much paint you use.


I painted the frame with Black Geesso Good once dry I painted one coat of Raven Black before stamping with Marshmellow paint and the Collector's Edition NO.6 Circle Dots stamp.


 Finally I stamped the Large Butterfly #2 and heat embossed it with clear powder before diluting some Raven Black paint with water and colouring the Butterfly once dry I put the the frame back together so it's all safe now behind glass.

Thank you for stopping by, I hope you've been inspired to try some paint pouring trust me you will love it.
Crafty Hugs
Cheremane x

Sunday, 12 November 2017

Merry Christmas

Hello Dear reader,

Today I have made a Christmas Card for you.
Normaly I'm not so fast with my cards ;)


I was started with the wonderful stamping card paper.


Trim the edges with masking tape, I tear the wide strip trough the middle, you will get a 
rough edge. I like that.


With Oxide ink in the colors wilted violet and peacock feathers I blend the paper.


Stamp The script stamp with water 


Dry with the heatgun, You will get a beautiful white script.


Place your Merry Christmas Tree  on a stamping platform
and stamp the tree in Black.
Do the same with the sentiment. 


To finish the card glue the card on a purple piece of cardstock and use a black
basic card. 
So I hope you have get some new inspiration from my card. 

Here you have the link of all stuff i have used.

Thank you for reading my blogpost and leaving a comment.  

Saturday, 11 November 2017

Art Journal Page - Lest We Forget


Hi Everyone it's Mike here - My IndigoBlu design team project falls on Armistice Day (11th November) and the Remembrance Day weekend so it's only fitting that I create an art journal page in remembrance of all those who died or were injured in wars in the service of their country.

IndigoBlu Products used:


To watch how I created the art journal page above click on the YouTube link below to watch the entire process from start to finish.


I hope you enjoy the video and will subscribe to the IndigoBlu YouTube channel for more videos just like this one.


Sunday, 5 November 2017

Snowy Feathers


Hello Jannet here today, have you started thinking about creating your Christmas/Winter cards and gifts yet? I have actually made one gift already which is for my parents. This Snowy Feathers  plaque, which features the lovely Robin. For once I was quite happy with how it turned  out, so I thought it might look nice as a card too.


I started by creating a background by using a brayer to apply Stonewashed and Terracotta Adirondack inks. and then spritzed over them with water.


The Robin stamped very nicely onto Watercolour card, and I used Watercolours to give him his famous red breast. I then fussy cut him, no feathers were harmed!


I found a comfortable looking twig for the Robin to happily sit on. I dabbed on some fine modelling paste and then shook some Unicorn Sparkles over it to create the glistening snow.
I stamped the Night before Christmas stamp from the Sparkle and Glisten Stamp Set onto the background. To create the icicles I applied a thick line of glossy accents to the top of the card and then stood the card up so it dripped nicely down, I then shook Unicorn Sparkles over the top.
I adhered the Robin onto the twig and attached the twig to the background. I added some dried moss  a pine cone and a festive red berry.
I finished by flittering white paint over the picture to create falling snow.
I hope you have fun making your cards - Unicorn Sparkles everywhere !