Tuesday, 26 September 2017

Christmas is coming....


Morning All,

Carolyn here with you today. I've been creative as long as I can remember and my interest in card making began over 10 years ago. I attended a local craft workshop weekly and it snowballed from there. Being involved with Indigoblu has broadened my horizons and I also enjoy mixed media too.
I made this card whilst creating my samples for Kay's Christmas ODS recently.


Firstly I created the background with Blue Luscious and added a few splatters.


I stamped the sentiment from the Christmas Wreath stamp set in dark blue.


The snowflakes were stamped with the blue Luscious onto shrink plastic and fussy cut. These were then blasted with the heat gun to shrink them.


The pale blue matt layer was a piece of white card that I'd painted with the blue Luscious.
 To finish the card this was then mounted onto a dark blue card blank


Thank you for joining me today

Carolyn
xx

Monday, 25 September 2017

Hello Autumn

Hello Everyone and Welcome!

Today Ksenija is here, and I am happy to share with you a new project as a part of September inspiration from International DT.
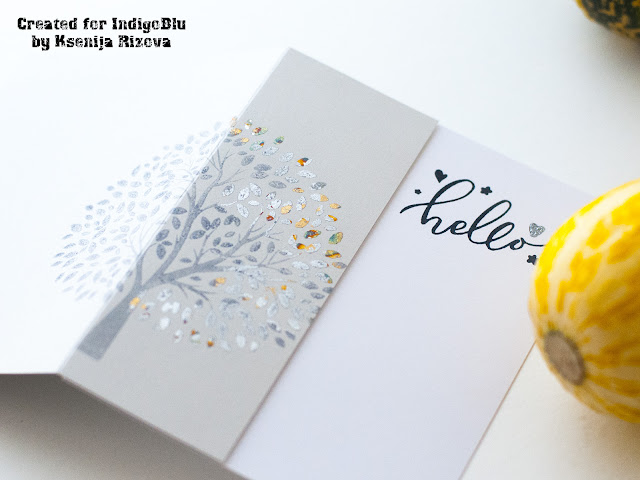
I would like to demonstrate the way to use big stamps for Clean and Simple cards. For my card I am combining Lollipop Tree and Dreams Come True stamp sets with Megaflakes. Clean and Simple (CAS) cards should have a lot free (white) space and preferably one focal image. To comply with CAS style rules I suggest stamping the big image over the crease line.
Lollipop Tree IndigoBlu Sweet Kobylkin
I started with cutting the card base to 5 1/2" by 6 1/4" and folding it vertically at 2". Then stamped the tree in soft grey archival ink down to a soft grey card base. I did not center it, but moved the stamp to the right to get the stem of the tree on the front panel.
Winter Dawn Megaflakes IndigoBlu Sweet Kobylkin

Then partially applied FlitterGlu to the tree stamp and made the second impression, which I covered with Winter Dawn Megaflakes. Winter Dawn - is a mix of silver foils with blue greens and shiny golds.
Dreams Come True IndigoBlu Sweet Kobylkin
I cut a white card panel to size 4 1/4" by 5 1/2" and stamped down Hello script from Dreams Come True set. To bind visually the grey card base and this panel I heat embossed one heart in silver powder.
To assemble the card I folded it at 2" and adhered the white panel under the narrow side of the card base.
Lollipop Tree IndigoBlu Sweet Kobylkin

Thanks so much for stopping by. I hope, you enjoy this card and you will play with IndigoBlu stamps and Megaflakes this week. Have a great start of the week!

IndigoBlu Supplies Used:
Lollipop Tree Stamp
Dreams Come True Stamp Set
FlitterGlu
Winter Dawn Megaflakes

Wednesday, 20 September 2017

Inspiration from International Design Team Members Ksenija and Carolyn

Lots more fabulous inspiration today from International Design Team Members Ksenija and Carolyn. For a closer look at ther fabulous projects follow the link to their own blogs (via the link on the sidebar).


Shine Bright Sweet Kobylkin


Carolyn

Tuesday, 19 September 2017

Inspiration from International Design Team Members Lydia, Cheremane and KayM

Lots more inspiration today from International Design Team Members Lydia, Cheremane and KayM. For a closer look at the fabulous projects pop over to their own blogs (via the links on the sidebar).


Monday, 18 September 2017

Inspiration from International Design Team Members Jannet, Elizabeth and Mike

We have lots of fabulous inspiration today from International Design Team Members Jannet, Elizabeth and Mike.

To check out the full project pop over to their own blogs (via the link on the sidebar).


Jannet


Elizabeth


Mike

Autumn Birch Trees 8x10 Acrylic Canvas


Saturday, 16 September 2017

Welcome Pegusas!


Hello,      Kay M here and would like to share a simple card with the fabulous new Pegasus stamp Kay Halliwell-Sutton launched last week on Hochanda.  It also comes with a wonderful sentiment that can be used whole or cut up as I have here.


I stamped Pegasus onto a 14.5cm2 white card and the sentiment on extra card with embossing ink then heat set bronze embossing powder.    


The sentiment was trimmed into two halves and edged with embossing ink then heat set bronze embossing powder.   


Pegasus  was coloured with pale alcohol pens to enhance his shape.


Bronze and Gold Luscious powders were mixed with a little water and painted directly onto the No. 6 Bubble stamp from the Limited Edition.   


Pegasus was masked with a cut out that was stamped onto copy paper, and had repositionable glue on the reverse.  The painted stamp was misted with water and repeatedly stamped across the image.   The sentiments were then attached.


The sentiments were also covered and gold Luscious mixed with water splattered over.    When dry the masks removed and the panel was adhered to the front of a 15cm2 white card blank.


I've had so much fun stamping with Pegasus and you get to love him too!


Thank you for visiting,   Kay M

Wednesday, 13 September 2017

Perfect Peony


Hello Cheremane here with you today. I just adore the new floral designs and have chosen the  A6 Peony for this creation, it really is a stunning stamp design. To begin I painted an in-expensive box with Black Gesso before I painting it with Stroke of Midnight.


I stamped four of the Peony's onto watercolour card with Versafine and heat embossed it with clear embossing powder. I then wet the area of the flowers and added some Mulberry Bush paint to the area with a small brush and let it travel where is wanted to go, as with the card wet the colour will flow where the water is.


I added some Olive waistcoat paint to some Phat foam and used it like an ink pad to stamp the leafs onto some watercolour card and also around the bottom of the box.


Once the Peony's were dry I layered the four together with glue gel. For the flower center I added some Lemon Meringue paint.


I finished off with a gorgeous sentiment from Mindfulness #2 heat embossed to the front of the box and attached the Peony to the top of the box with some Super Thick Slap It On.

I hope you enjoyed my piece of inspiration for you today.
Cheremane x

Tuesday, 12 September 2017

Live Laugh Love


Hello dear reader,

Today it's my turn to inspire you on in this wonderfull team.


I start with a white craft card and 2 colors distress ink, Broken China and Evergreen Bough.


I spinkle some water on the card


bring distress ink with mask on the card


stamp with bubbles and script from the designer collection on the edges in the same colors.
and with an oldie (one of my fav) the swirl in black.


At last I stamp the butterfly and sentiment from the set Live Laugh Love code LLL.


I hope you have enjoy my blogpost 
thank you for being here.


Hugs

Monday, 11 September 2017

The Poppy Fairy

Hi Everyone,

Mike here with my very first official International Design Team blog post and project. I've been crafting for over 10 years and started to play more with mixed media and art journaling over the last three. I started my YouTube channel in 2015. I've been a fan of IndigoBlu for most of my crafting life!

For my first official project I decided to create a mixed media Poppy Fairy bust using one of the paper mache busts from IndigoBlu and use one of the new release stamps sets called "Wild Poppy". I teamed that up with the Big Butterfly #2 stamp and some IndigoBlu paints, mainly Lime Marmalade, Banana Custard, Ruby Slippers and Emerald City! What a great combination!


You can watch the entire creation process from start to finish by clicking the video link below. Don't forget to give it a thumbs up, share with your friends and subscribe to the IndigoBlu YouTube channel for more videos from the Design Team.


Wednesday, 6 September 2017

Friendship


Good morning and welcome from Elizabeth with the first of the posts from the new International Design Team for 2017/18.

I absolutely adore the new Big Butterfly #2 and combined with the new A6 Peony  it's just perfect.


I started by making a master board using Coastal Walk, Marshmallow, Olive Waistcoat and Lime Marmalade Cottage Garden Paints 


I stamped out the Butterfly once, and the Peony and Ferns a couple of times in Black Versafine. Then heat embossed them using a fine detail clear embossing powder. After they had cooled, I cut out all the elements.


I then diluted some of the gorgeous Blue Luscious Powder and brushed over the top of the Ferns, the Butterfly wings and to create shadows on the Peony's.


Once the Luscious had dried it was just a case of creating a design with the pieces onto a C5 card blank that had been covered with a piece of vintage music paper.


I added glitter to the centre of the Peony's, splashes of diluted Blue Luscious and of course I can't resist a few sequins.


I hope you enjoyed the process and have found a little inspiration.

Elizabeth x