Showing posts with label Mulberry Bush. Show all posts

Tuesday, 4 December 2018

Snowy Winter Foxes


Hello I hope December finds you well and happy. The time is soon approaching for us to think about decorating our homes. With this in mind I have made this winter forest scene using a collection of the gorgeous new stamps. It is easy and fun to make


I used a 25 cm square  box frame. I started by cutting  some card to fit the back of the frame and used Mulberry Bush paint to give it some colour. I heat embossed the snowflakes from the Alternative Christmas stamp set around the edges.


The tree stamps from the Tree Dressing stamp set made perfect forest trees which I coloured with Olive waistcoat, before fussy cutting them. Stamps can be very versatile, and you don’t always have to use  the whole stamp.  I stamped just the fox from the Willow and Fox stamp. I wiped away the ink on the girls hands before stamping. I used some needle felting wool to shape fluffy tails for the foxes.  


I kneaded some modeling paste into the bottom of the frame, and placed a wood slice into it which would later hold my chipboard hares. I stood my tree and animals up into the modelling paste. I also stamped the hare from the Guardian Angel  stamp so he could join in too. Stars  from the Tree Dressing set flew to the top of the trees, and I added strings of pretty pink beads to the trees and also as a decoration hanging  across the inside  top of the frame. 

The forest needed some snow so I applied  texture paste over the base using a palette knife. Then followed with a sprinkling of Unicorn Sparkles. I finished by adding a piece of a fir tree, small pine cones, chipboard hares, and a splatter of  white paint over the scene.

You could also create this scene inside of a recycled box or tin.

Have fun creating your winter decorations, if it is not too early I would like to wish you a very happy and healthy Christmas Season xx


Friday, 11 May 2018

Oriental Style All Occasion Card with Mike Deakin


Hi Guys,

It's my turn to share a quick card project with you today, so I've created an oriental style 6x6 all occasion card using a few IndigoBlu products as follows:


I made a quick video of the process from start to finish so you could see exactly how I made the card and stamped the peony image using the Goldfinger paint. Click below to watch.

Don't forget to like and subscribe to the IndigoBlu YouTube channel for more video projects from the other members of the Design Team.


Saturday, 13 January 2018

Hello


Cheremane here with you today with my first project for 2018.  I've used one of my favourites for today's creation I adore the Florals.

Firstly I stamped the Peony and Leaves with Black Versafine and heat embossed with clear powder onto watercolour card.

I wet the cardstock before adding tiny amounts of Mulberry Bush and Hunter Green which I had mixed with water too as it adds more of a watercolour feel to you image,


Then I stamped and heat embossed the Hello sentiment from Dreams Come True and added the border from the super Aztec Borders set which was realeased on Hochanda just before Christmas.

I mat and layered using coal black stamping card and when the peony and leaves were dry layered them with glue gel to finish.

Be sure to check back again soon for lots more inspiration from the team.
Crafty Hugs 
Cheremane x

Friday, 5 January 2018

Pegasus


Hello, Jannet here today to wish you a magical, happy, and above all a healthy 2018! I wanted to begin this new year with a magical and hopeful card featuring the gorgeous Pegasus He is already to take off on his first flight of the year.


I used versamarker on his wings and heat embossed in silver. I then coloured the wings with Porcelain luscious which I had already  mixed with a little water. It gives such a lovely sheen, just perfect for wings!


After stamping the gorgeous Pegasus I added colour to him with Pink, Porcelain, and Poseidon Blue Luscious.


My favourite colour is pink so I chose Mulberry Bush and Marshmallow Paints for the  background colours. Of course not everyone is a lover of pink, so they can be any colour of your imagination. 
I selected the word Hope from the Faith  stencil, as I thought this was the best word to start a new year with. I used fine texture paste in the stencil and painted over it with what else but Pink luscious !

I added some Wishing Stars from the Stars stencil, and some random circles from the Texture stencil 


I added the Numbers stamp to represent the count down to the new year and also for the days to come in this new year.

I added Pegasus and his wings to the background with 3d sticky pads. I curved the larger wing forwards a little.


The Luscious. coloured some dried flowers very nicely.

I added some Fine Texture Paste mixed with a little Mulberry Bush paint at the base of the picture, and added a selection of clear beads and tiny stars which reflect light .A new year is often a time for reflection.. 

May all your hopes come true in 2018 xxx

Wednesday, 13 September 2017

Perfect Peony


Hello Cheremane here with you today. I just adore the new floral designs and have chosen the  A6 Peony for this creation, it really is a stunning stamp design. To begin I painted an in-expensive box with Black Gesso before I painting it with Stroke of Midnight.


I stamped four of the Peony's onto watercolour card with Versafine and heat embossed it with clear embossing powder. I then wet the area of the flowers and added some Mulberry Bush paint to the area with a small brush and let it travel where is wanted to go, as with the card wet the colour will flow where the water is.


I added some Olive waistcoat paint to some Phat foam and used it like an ink pad to stamp the leafs onto some watercolour card and also around the bottom of the box.


Once the Peony's were dry I layered the four together with glue gel. For the flower center I added some Lemon Meringue paint.


I finished off with a gorgeous sentiment from Mindfulness #2 heat embossed to the front of the box and attached the Peony to the top of the box with some Super Thick Slap It On.

I hope you enjoyed my piece of inspiration for you today.
Cheremane x

Friday, 16 June 2017

Book of Flowers

Hello, Kay M here today to share my project with this month's theme, Blooming Marvellous. It has been inspired by the lovely Jenny Marples, she kindly gave me a set of Eileen Hull's journal die she had cut for from mount board and a painting technique she demonstrated last year. I've made a Book of Flowers to store my flower seeds both brought in and saved from the garden.


A piece of calico was cut 3cm larger than the made up mount board journal and placed onto a craft mat. Lemon Meringue, Burning Bonfire and MulberryBush paints was painted in horizontal strips onto the calico and then sprized with water to blend, it was then left to dry.
 

Images from Victorian Garden and Nature 1 was then stamped in black Archival ink. The calico was the attached to the journal using Fabric Slap-It-On and eyelets attached when dry.


A sheet of Damaged Dots paper was used to line the inside covers and make pen/pencil and label holders. 


I made one signature, the cover could hold up to three, from kraft card, all the pages were the same with a pocket for a packet of seeds an space for notes. Before making up the signature each page was decorated on both sides, firstly a wash of white Gee-Sso-Good, then random brush strokes of diluted Lemon Meringue, Burning Bonfire and Mulberry Bush paints. When these were dry Giant Poppy and Giant Peony was stamped over with black ink, finally white Gee-Sso-Good was sponged to provide areas to make notes.


The tie closure was coloured with Burning Bonfire and secured with a button and a couple of tassels were attached to finish.


May your summer be full of colourful flowers.

Take care, Kay M

Thursday, 16 March 2017

Easter Egg


Hello, It's Kay M here today with my spring project, a decorated egg which are a wonderful celebration of the season.   I have decorated a papermache two part egg shaped box, just perfect to house a chocolate egg!

A number of leaf sprigs were die cut and applied all over the outer surface using the Slap-it-On Matt  then GeeSsoGood white was painted both on the outside, and inside of the egg, then left to dry.    
I painted the inside with Lime Marmalade for a bright pop of colour.


The outside was painted first with Peppermint Tea and dried.  Then I applied Olive Waistcoat over the leaf shapes with a paint brush and removed excess with kitchen towel so the paint was removed from the raised areas.  LimeMarmalade was then dry brushed over, this gave a lovely textured appearance to the egg.


A sentiment from Victorian Garden was stamped in black ink and heat embossed with clear powder onto white card, cut out and edged in black ink and adhered to the egg.

The flower sprig from the Clock Work Stamp Set was repeatedly stamped in black ink and heat embossed with clear powder onto white card.  They were then painted with Mulberry Bush and Lemon Meringue paints and after the flowers had been fussy cut, they were glued onto the leaf shapes.


The Bee from Victorian Garden was repeatedly stamped in black ink and heat embossed with clear powder onto heat resistant acetate.   Lemon Meringue paint was painted over the bodies and left to dry.   The Bee's were then fussy cut and attached to the egg.
I finished by adding a chocolate egg!


I do hope you have enjoyed my project and are inspired for you Easter makes.


Kay M. 

Thursday, 23 February 2017

Love canvas

Hi! Solange Marques here again! I'll share with you the project for this month!
February is Valentine's month, then The month theme is LOVE!!!!!

I've created a canvas:

I've used a Square Flat Canvas and I applied modelling paste on the Believe stencil. Then I applied
English Cottage Artist's Acrylic paint Hot Cocoa and GeeSso Good!Gesso-white on the background and I've painted a heart with Postbox Red and Mulberry Bush:


I've used Word Blocks stamp:


I hope you enjoy it!

Monday, 16 May 2016

Roses on Fabric

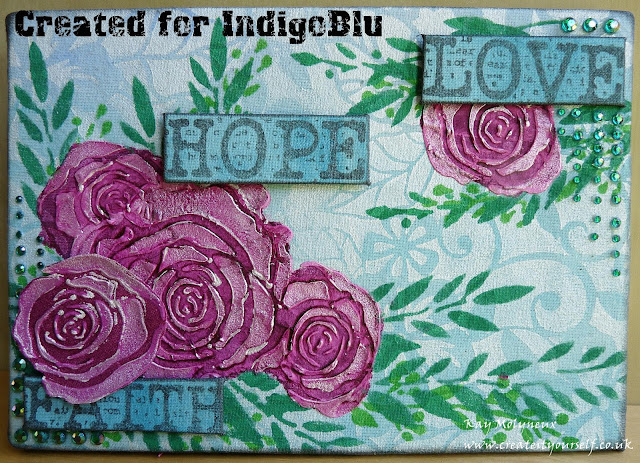
Hello, Kay Molyneux here. Today I would like to share my painting on fabric project with you. I used calico material instead of a blank canvas and painted, stencilled and stamped it with the IndigoBlu English Cottage Artist's Acrylic paints, then attached it to an old photo frame to display it. As this was a bit of an experiment there are not any step by step photos but I'll talk you through what I did.


Two lengths of calico fabric, one big enough to cover the photo frame, the other for the sentiments and was painted with Townhouse Teal, Kingfisher Blue and Snow White paints an blended together with water to produce a wash. When dry, Snow White paint was stencilled through the Floral Fantasy stencil on the main panel. The leaves were stencilled through the Laurel Leaves stencil with Hunters Green and Lime Marmalade paints mixed together in different ratios.    


Mulberry Bush paint was mixed with a little fine textured paste then applied through the Roses stencil and left to dry. Mulberry Bush was painted over the roses, the stencil was then replaced and Snow White paint applied, I used my finger for this. An extra rose was produced with spare fabric in the same way and cut out.

Words from Word Block #1 stamp set were stamped onto the remaining painted fabric with Raven Black paint and mounted onto card.


To finish, the panel was attached to the old photo frame, the sentiments added, the cut out rose attached. Gems just added a little 'bling'.

I had a lot fun experimenting and do hope you feel inspired to have a go too!

Until next time, take care, Kay M

Stencils-    Floral Fantasy,  Laurel Leaves, Roses,