Showing posts with label Slap It On Matt. Show all posts

Sunday, 16 April 2017

20,000 Leagues


Hello and welcome,    Kay M here today with a 20cm x20cm canvas with my take on this month's theme of story telling.  The story is not personal but the classic 20,000 Leagues Under the Sea by Jules Verne.  


The Nautilus came to mind  after I finished Steampunk inspired mini panel so it was incorporated into canvas using two of my favourite stamp sets- Steampunkesque and Under the Sea.  

For the canvas background fine textured paste was applied through the Laural Leaves stencil over the lower half, when dry the whole canvas was painted with Gee-Sso-Good white.  A wash of Stroke of Midnight, Kingfisher Blue and Emerald City then painted on, misted with water and left to dry naturally.   


  Images from  Under the Sea were then stamped with Kingfisher Blue and Vodka Martini.


The Steampunk inspired mini panel was made by arranging strips of hammer card in a random patchwork pattern on to a10cmx10cm  grey board and adhere with Slap-It-On-Matt.  

Apply 3D paint dots along the seam edges and dry.    


 Glue pin, cardboard and resin shapes as shown and dry.  


 Paint the entire board with black Gee-Sso-Good


For the metal effect blend a little Gee-Sso-Good- Black with Sleeping Beauty paint and Raven Black with a little Hot Cocca paints on a plate/tile, 


Use a paintbrush to apply each paint mix in patches over the surface and blending together, when dry, repeat. 
 

Use a finger to apply Gee-Sso-Good white to highlight the raised areas and edges.   Dry brush PheasantBronze and Vodka Martini paints individually over the whole board, concentrating colour on the shapes and faux rivets. 


The image from Steampunkesque was stamped, heat embossed in clear, painted and fussy cut.  

The ship's wheel and anchor were die cut form kraft card and 3D Roman numerals to the value of 20,000 had Chocolate Box Megaflake applied with FlitterGlu.   


All the elements were adhered to the canvas and a colourful 'monster from the deep' made from paper clay and painted with IndigoBlu English Cottage Paints added to finish.

 Thank you for visiting today and I hope you are inspired!

 Take care,  Kay M x

Thursday, 16 March 2017

Easter Egg


Hello, It's Kay M here today with my spring project, a decorated egg which are a wonderful celebration of the season.   I have decorated a papermache two part egg shaped box, just perfect to house a chocolate egg!

A number of leaf sprigs were die cut and applied all over the outer surface using the Slap-it-On Matt  then GeeSsoGood white was painted both on the outside, and inside of the egg, then left to dry.    
I painted the inside with Lime Marmalade for a bright pop of colour.


The outside was painted first with Peppermint Tea and dried.  Then I applied Olive Waistcoat over the leaf shapes with a paint brush and removed excess with kitchen towel so the paint was removed from the raised areas.  LimeMarmalade was then dry brushed over, this gave a lovely textured appearance to the egg.


A sentiment from Victorian Garden was stamped in black ink and heat embossed with clear powder onto white card, cut out and edged in black ink and adhered to the egg.

The flower sprig from the Clock Work Stamp Set was repeatedly stamped in black ink and heat embossed with clear powder onto white card.  They were then painted with Mulberry Bush and Lemon Meringue paints and after the flowers had been fussy cut, they were glued onto the leaf shapes.


The Bee from Victorian Garden was repeatedly stamped in black ink and heat embossed with clear powder onto heat resistant acetate.   Lemon Meringue paint was painted over the bodies and left to dry.   The Bee's were then fussy cut and attached to the egg.
I finished by adding a chocolate egg!


I do hope you have enjoyed my project and are inspired for you Easter makes.


Kay M. 

Thursday, 16 February 2017

Chocolate and Roses Canvas


Hello and welcome,  
Kay M here today with my Chocolate and Roses canvas board. The  chocolate comes from the gorgeous ChocolateBox Megaflakes and the roses with the Rose stencil and colours chosen to give a vintage romantic feel to highlight this month's heart theme.

 Fine texture paste was thinly spread over a 18cmx24cm canvas board to give a rough plaster texture.  When dry, more paste was used through the Rose stencil across the middle of the board and dried,  then  whole board was painted with Gee-Sso-Goodwhite.   Pheasant Bronze, Townhouse Teal and Marshmallow paints was applied in patches and brush blended into each other.  When dry, Dinkie Script was randomly stamped over and the roses highlighted with a brown Archival ink.    Gee-Sso-Good white was dry brushed over the canvas for a softer look. 


Super Thick Slap it On was mixed with a little Rose Bronze Luscious powder and this was applied through the Family stencil onto tissue paper. When dry,  individual words were added to the canvas with Matt Slap it On.

The Dinkie Heart stamp was stamped with FlitterGlu on card and then covered with Chocolate Box Megaflake.  The heart was then cut out, given a wash of Rose Bronze Luscious then clear embossing powder applied.    Another heart was stamped out using Brown Archival ink on a sheet of card which had been painted with Rose Bronze Luscious powder, that was then cut out.   Chocolate Box Megaflake's were also applied to a heart frame.  


The canvas was finished by adhering the hearts with lace trim, die cut arrows and a feather embellishment as shown.   

I do hope you get inspired to join in our heart theme this month and enter the blog challenge! 

Take care,  Kay M

Monday, 26 September 2016

Santa Ornament


It is Cec here and today I am bring you a little more Christmas in the form of an ornament.


This ornament starts with an old DVD.  I got my husband to drill a single hole at the top to accommodate a hanger and three holes at the bottom just in case.  Next I cut some scalloped circles on my Cameo to cover it.  I was decorating both sides of the DVD so I cut two circles larger than the DVD and two the same size.


The next step was to paint the circles.  I had one plan in mind and painted randomly on one side of each circle with Ruby Slippers, Goldfinger and Emerald City Metallic Paint and then I wiped it back a bit with a baby wipe.  It didn't turn out the way I wanted it to - you can see the result when you look at the centre of the larger circle.  Instead of sending it to the circular file marked "G", I decided to cover it with slightly watered down Ruby Slippers.  I liked the look then.   Since the smaller circle was going to be mounted on top of the larger circle, I didn't waste any more paint by going all the way to the centre of the larger circle.


The next step was to stamp the smaller circles with the IndigoBlu Script Background stamp and Jet Black Archival Ink.  This is rapidly becoming a favourite stamp.


I crumpled up some white tissue paper into a tight ball and then opened it back out again and glued it to the smaller circles using some Matte Slap it On.  Once it was dry, I trimmed away the excess tissue.  If you don't wait until it is dry, the tissue will disintegrate in your hand.  If you use a plain scallop rather than a double scallop like I did, it will be even easier to trim.

I forgot to take a photo of this next step but I covered the tissue with some watered down Goldfinger Metallic Paint and then inked the edges with some Red Geranium Archival Ink.  I also mixed some Silver Luscious with water and pounced it on randomly using a stencil brush.


I covered the DVD next by adhering the DVD to the back of one large circle using Super Thick Slap it On.   This is a fairly fast grab so you have to work a bit quickly but of all the fabulous things it does, it is a terrific adhesive.  Once dry, I made a hole through the circle where the single hole was drilled in the DVD.  I decided not to use the bottom holes this time.


I glued the second circle on the other side of the DVD and held it in place with paper clips until dry.  Then I made the hole at the top on this side and touched up the edges of the hole on each side with a bit of paint.  It is much easier to locate your hole by doing it one step at a time as I have than trying to find where it goes if you have everything covered.

While I could still see my hole, I added some narrow red satin ribbon to make a hanger.


I stamped two copies of the Santa head from the Retro Christmas set using Jet Black Archival Ink and fussy cut them.


I coloured my Santas using Prismacolors for the face, hat and beard.  I added a little bit of Silver Luscious to the beard and used a Snow Marker from Uchida to make the fur on the hat.  This goes on like a white marker and then you use your heat gun to puff it up.

For final assembly, I added fun foam with double sided adhesive to the smaller circle and popped it up on top of the larger circle on each side.  Then I repeated this process with the Santas and added them on top of the smaller circle.  Finally I added some red gems for a bit of bling.

I hope you are inspired to dig out an old DVD or CD and transform it into a new ornament for your tree with one of the many fabulous Christmas stamps from IndigoBlu - new or old.

Tuesday, 16 August 2016

Jewel and Roses


Hello it's Kay here,  I do hope you enjoy my first post for this year's IDT, loving the work from the other ladies, it seems we all have fallen for Jewel!


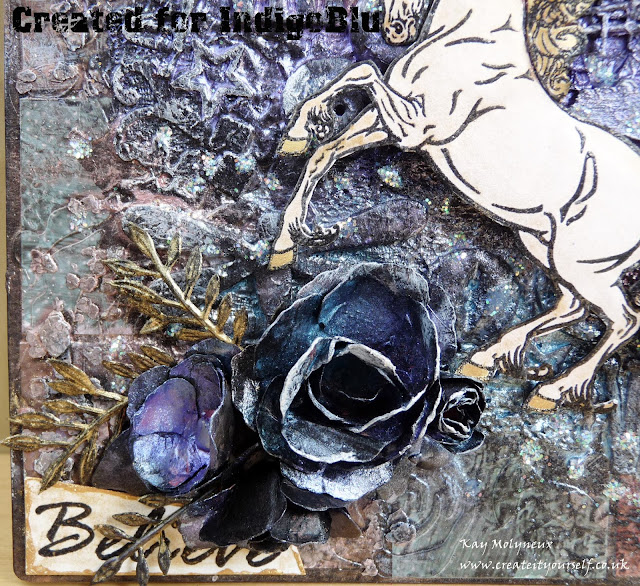
 I've used the fabulous new Luscious powders, Extra Thick Slap-it-onRose stencil, Jewel, Spirit of Christmas, Unicorn Sparkles AND a sneaky peek at the soon to be released 6x6 paper pads!!   This is a board inspired by the Finnabair class on this year's Wanderlust journey. 


The 6" square canvas board was painted with Black Gee-Sso-Good, then small squares of the new papers were adhered on top with Slap-It-On-Matt, Extra Thick Slap-It-On was applied through the rose stencil.  This was then left to dry.


Texture elements- buttons, mesh, hot glue dots, chip board shapes were then applied using the Slap-It-On to the centre area of the board.  When dry these were then painted with Black Gee-Sso-Good and left to dry.  A small amount of Black Gee-Sso-Good was mixed with Slap-It-On Gloss and this was used as a wash over the whole board and to soften the margin of the black painted area and left to dry.


Out came the Luscious! Coral, purple and teal powders were dusted over the board and missed with water to set.  Jewel and the sentiments where stamped in black ink and heat embossed in clear powder, these were coloured with gold Luscious.


Paper roses were painted black and coloured with the purple and teal and foliage with gold Luscious powders.  These were attached to the board and silver Luscious mixed with water and applied to highlight raised areas before Jewel and the sentiments were adhered.


To finish,  dots of FlitterGlu were added around Jewel and Unicorn Sparkles applied, magical!


I really had fun making this board and hope you have enjoyed it too.


Take care,  Kay M x