Monday 26 March 2018

Happiness in Nature


Good Morning, Carolyn here with you today sharing my latest card using the most recent releases from IndigoBlu.


It's been a while so I thought I'd have a play with my Faber Castell Gelatos to create a colourful background. I chose Lavender, Grape, Tangerine, Bubble Gum and Mango. I randomly scribbled the colours on an A5 piece of watercolour card.


I then spritzed this with water and let the colours run taking care not to let them become a muddy mess. I dried this with my heat gun and laid down more colour so they were more vibrant. I used a baby wipe to merge the second layer of colours.


For the words I scribbled the Lavender and Grape Gelato over the stamp and spritzed with water before stamping onto watercolour card. I then cut these out.


The flowers from Nature III were stamped with Distress Oxide (Wilted Violet, Spiced Marmalade, Picked Raspberry). I used my water brush to pull some of the colour from the stamped image to create a watercolour effect. I then fussy cut all the flowers.


To create more interest in the background I stenciled the Inky Dink Wild Rose Stencil with Fine Modelling Paste before placing the words and flowers over.


Finally I assembled the background onto a purple card blank before positioning and adhering the words and flowers.


Thank you for joining me today and do pop back to see the fabulous inspiration from the team. 

Happy Crafting

Carolyn
x

Sunday 25 March 2018

STAMP FOCUS | Peony

Today Ksenija is here and I am sharing my tips on how to easily make a pretty card with Peony red rubber stamps set.

Tips On Making This Card:

  • Start with stamping a flower from Peony red rubber stamps set in embossing ink down onto a black card stock base and heat embossing the impression with very fine white embossing powder
  • Trim a white card stock card panel down to 8.5 by 12 cm
  • Stamp down the flower onto the white card panel in black archival ink
  • Continue with colouring just a few petals and the center of the flower with colour pencils
This is a double-layered card and aligning of the layers is crucial for the design. I recommend using MISTI Stamp Positioning tool to stamp the flower in the same position

Thank you for stopping by. Have a great day!

Tuesday 20 March 2018

Inspiration from International Design Team


Good Morning and welcome to today's inspiration from the team.

Check out their blogs from the links below and also on the side bar.


Monday 19 March 2018

Blog Inspiration

Hello and welcome,  There is some inspiration from the International Design Team on their blogs.


Sunday 18 March 2018

Inspiration from Jannet and Mike

Some more Inspiration for you today from Design Team members Jannet and Mike. Why not click their names and check out their blogs for more info?


Friday 16 March 2018

Dragonfly card

Hello,    Kay M with you this morning and I would like to share a card made with the latest new stamps from IndigoBlu. Kay launched these yesterday on Hochanda and they were so popular, there may be a few on the Hochanda web site if not check out the IndigoBlu one. I was very fortunate as Kay gave me them when we met for a coffee after her first show- it's not very dignified to get so excited in a M&S cafe! Anyway rushed home(after a drink and a shop) and made this card.


Sorry, but as I was playing I didn't take any step photos but it's fairly straight forward and I'll talk you through it.

I cut a 14cm square of Shenna card and stamped the bouquet from Nature III in opposite corners with clear ink and heat embossed with silver embossing powder.  The edges were also inked and embossed.  Candied Apple and Wilted Violet Distress Oxides were then sponged over and the flowers were painted with water to remove some to ink these were then painted in with a wash of Unicorn Tears Luscious.   Drops of water were added to give extra interest. This panel was matted onto black card and attached to the front of a 15cm2 white card blank.

More Shenna card was sponged with the same inks and then a wash of Unicorn Tears Luscious, when dry individual flowers from Nature III were stamped in black ink and heat embossed with clear powder and fussy cut.

The fabulous Giant Dragonfly was stamped onto Matte Dura-lar in clear ink and heat embossed with silver embossing powder and then painted with Mermaid's Tail and Teal Luscious powders and fussy cut.

To finish the card, a sentiment from Nature III was stamped and cut out and with the flowers and dragonfly attached to the card with a hot glue gun as shown.
Love these new releases and will get so much use from them as they fabulous for Spring but will work so well for the rest of the year as well.

Take care. Kay M x

Monday 12 March 2018

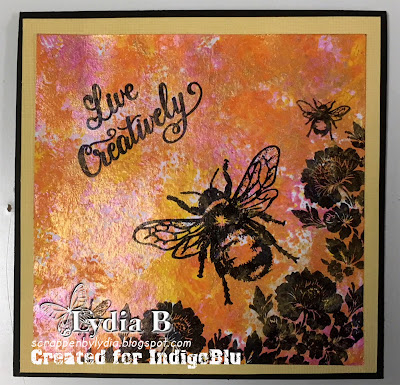
Live Creatively

Hello dear Reader,

How are you today, I hope y're fine, and 
in a creative mood.


I have stamped  IndigoBlu paint on an Acrylic bloc, it's an old technique
that I have done years ago with ink. You can also do it with paint. 


First you start with a few beautiful color IndigoBlu paint
and Lucious powder for the shining effect.


Do a little bit of paint on a Acrylic bloc spritz with water
and spritz with water on your stamping card 
stamp with gently pressure on the card.
Repeat this with different colors. You can dry between 
the colors. 
At least bring a little bit Lucious powder on a craftsheet 
spritz with water and bring it on your card with a paintbrush.
spritz water over the card and let it drip.
Dry with the heattool.


Its hard to see on pictures, bud you can see the shinning 
from the luscious powder.
When the card is dry you can stamp the flower (floral bouquet) and the Bumblebees  
with StazzOn ink.
The sentiment I use is from the sheet "Dreams come True"


I hope to inspire you on this creativety day.
with a big hug


Sunday 11 March 2018

Peony Flower Mother's Day Card

Hi Everyone, Mike here!

It's Mother's Day here in the UK and I thought I'd share the card I made for my Mum using IndigoBlu stamps and acrylic paints.


So for this 6"x6" Mother's Day card, I've used:

I filmed my entire creation process so you can watch how I created the whole thing from start to finish, simply click the IndigoBlu YouTube link below.

Please remember to give the video a thumbs up as it really does help spread the word about IndigoBlu, share the video with your friends and subscribe to the IndigoBlu YouTube channel for more videos featuring IndigoBlu products, just like this one!


Monday 5 March 2018

Stamping On Rose Petals


Hi Jannet here today, I was recently looking through my box of pressed flowers, and noticed that some of my Rose Petals were quite large. So I thought that one of the new Peony stamps might fit onto it, but can you stamp on petals? I had no idea so I decided to experiment......

I used a versafine inkpad to stamp directly onto the petals and it worked ok, but it took forever to dry so if you have a Stazon that might be better. Then I started to cut out the  stamped image, and of course the petal is very delicate. I kept going, then I was wondering about how am I going to adhere these petals as they are so transparent. I halted what I was doing, and had a think, think, think. I decided to try some double sided adhesive sheets, and peeled of one side and placed the stamped petal onto it. It worked !


 Not all of the peony fitted on one petal so I stamped other petals with the missing parts. 

I wanted more stability to the flowers so I peeled off the other side of the adhesive sheet  and adhered it to some card before fussy cutting.


To assemble all of the flower pieces together I stamped the original flower on some copy paper to use as a guide, and placed the pieces over it until they fitted together.


I also stamped the leaves onto dried leaves and followed the same process.


I finished by painting on the stamens, and  heat embossing the word thanks from the Dreams Come True Stamp set. I mixed my paints to match the colour of the rose petals, and gently flicked the paint over the 17.78cm/ 7inch card.


I hope you will enjoy experimenting with stamping on pressed flowers too, have fun ! xx