Showing posts with label Cottage Garden Paints. Show all posts

Monday, 12 March 2018

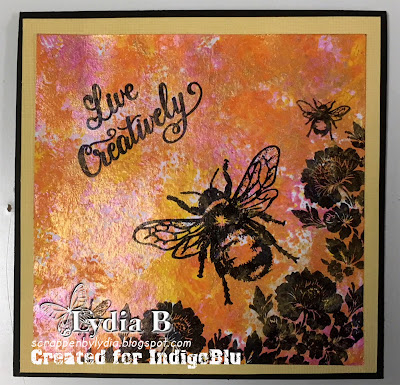
Live Creatively

Hello dear Reader,

How are you today, I hope y're fine, and 
in a creative mood.


I have stamped  IndigoBlu paint on an Acrylic bloc, it's an old technique
that I have done years ago with ink. You can also do it with paint. 


First you start with a few beautiful color IndigoBlu paint
and Lucious powder for the shining effect.


Do a little bit of paint on a Acrylic bloc spritz with water
and spritz with water on your stamping card 
stamp with gently pressure on the card.
Repeat this with different colors. You can dry between 
the colors. 
At least bring a little bit Lucious powder on a craftsheet 
spritz with water and bring it on your card with a paintbrush.
spritz water over the card and let it drip.
Dry with the heattool.


Its hard to see on pictures, bud you can see the shinning 
from the luscious powder.
When the card is dry you can stamp the flower (floral bouquet) and the Bumblebees  
with StazzOn ink.
The sentiment I use is from the sheet "Dreams come True"


I hope to inspire you on this creativety day.
with a big hug


Monday, 5 February 2018

Love Letters


February is synonymous with Love, so I thought I would begin the month by spelling it out! 

I already had the “L”, “V", and “E”, wooden letters in my stash, but I didn’t have an “O” ! Luckily I was able to find a papier-mâché “O” it was a little larger than the other letters, but I crossed my fingers that it would work out ok.  


I painted the “L” and “V” with Grandmas Teacup paint, and outlined them using Poseidon Blue Luscious  which I had premixed with a little water.

I took some time deciding which stamps to use and I eventually decided that a nature theme would be nice using butterflies, flowers, birds etc. I stamped using a Versamarker ink pad and heat embossed the images in white.


                      Anemone and Daisy
                              Wild Poppy


I also embossed some butterflies onto card, and coloured them with the Indigoblu paints before fussy cutting them. I folded two of them in half, and stuck the folded sides together using sticky pads and adhered them onto the letters to look as if that had just landed onto them. I also laid one butterfly flat onto the "O" and "V" letters using pva glue.


I painted the “O ”and “E“ with Iced Gem paint, and outlined them using Pink Luscious which I had mixed with a little water.

I repeated the stamping and embossing as above, but also added the darling robin to the “O”, and fussy cut lots of the little flowers from the Wild Poppy set to add to the "E".


Wishing you a lovely Valentines Day, at least us crafters can always create our own flowers to give ourselves on the day !


Tuesday, 16 January 2018

Acrylic Bee Tag


Hello it's Kay M here today and welcome to my first post of the year. 


I would like to share this tag with you.  The lovely Nikki Killinger gave me a crafty goody bag for Christmas and it included an acrylic tag.  So I thought I'll use it with a technique Nikki has shown on Hochanda last year, here's my version.

One side of the backing was removed from the tag and the large bee from No 9 Bumblebees Collectors Edition was stamped with black StazOn Ink and they were painted over with Snow White for the wings, Lemon Meringue and Burning Bonfire acrylic paints.  


When dry, Lime Marmalade, Cinderella and Purple Rain were watered down and splattered over the tag one colour at a time, making sure each was dry before adding another.    


When all the splatters where dry I sponged over the tag with Townhouse Teal and Wimberry Pie blending the colours to give a soft colour transition.   Again this was left to dry. 


The painted tag was then covered with Black Gee-Sso-Good and dried.   


Now the fun bit, peeling the baking for the reveal!  


I then stamped the sentiment from Pegasus and stars from Victorian Garden in Black StazOn.  And added a ribbon to finish the tag.     

I do hope you have enjoyed my take on Nikki's technique.

Take care,  Kay M x