Monday, 27 March 2017

VideoTutorial: Spring in a tin

Hello , Giovanna here with my first video tutorial on the IndigoBlu Youtube channel. I hope you enjoy it!
Upcycling is definitely my cup of tea, and it has been a long time since I altered a fish tin. Now is a tiny house for a couple of sparrows to celebrate this incoming Spring.


Some details:

I hope you have a chance to upcycle a tin with the marvellous IB stamps, it is super easy!

Materials I used:

IndigoBlu Slap It On - Super ThickGeeSso Good! Gesso - White 120ml Live Laugh Love A5 Red Rubber StampFaber Castell Gelatos - 6 different set options (shipping from 1st November)Luscious Pigment Powders - 25ml (13 colour options)Floral Fantasy A5 Red Rubber Stamp - by Kay Halliwell-Sutton


Sunday, 26 March 2017

Spring Tag


It is Cec here and today I am bringing you a spring tag that I created.


I am very, very fortunate that my husband has a laser cutter in the basement (it was his retirement present to himself) so he can cut me pretty well anything I want.  I don't like that normal manilla tags warp when you add lots of wet media so I got him to cut me a 4" x 8" tag from mat board.  The first thing I did to it was give it a border with Hot Cocoa Acrylic Paint because I intended to add a second layer.


I also had my husband cut a second tag from heavy card stock that was 1/4" smaller all the way around to use as a second layer.  I used some texture paste and the IndigoBlu Texture stencil to add some dimension.


Next I used some Slap it On Matte to add a few clusters of seed beads that I picked up from the dollar store.


I used some Martha Stewart Crafter's Clay and a Prima Mold to make a florish.  When it was dry I cut it in half and added it to my top layer using Super Thick Slap it On to ensure that it would not fall off.


I added a coat of Gee-Sso Good White gesso over the top of this layer and then sponged on Townhouse Teal, Coastal Walk and Hot Cocoa Acrylic Paint.  it was brighter than I wanted so I sponged a bit of the gesso on over the paint to knock it back a bit.


Then I decided to add a few spray inks - Tim Holtz Gathered Twigs and Lindy's Frozen Jack Frost but it didn't turn out as I expected.  I have a love/hate relationship with spray bottles and usually they won't spray when I want them to but this time the Tim Holtz bottle sprayed way too much.  I grumbled a bit and then started sponging the paint colours back over all the brown.  I also stamped some script from the IndigoBlu Tasty Textures set with some Coffee Archival Ink.


Next I used the Coffee Archival Ink to stamp a couple of flowers from the Live, Laugh, Love set on pale yellow card stock, fussy cut them and shaped them with a large embossing tool.  I used a sponge to add some gesso to the edges of the flowers and then mounted one on top of the other.


I also used a punch from EK Success to punch a bunch of little flowers from some of the 12" x 12" Damaged Dots paper.  I went back and cut a batch of even smaller flowers just to mix things up a bit.  Then I shaped them and added a bit of gesso to the edges.  When you see these little flowers on the finished tag take note of how well the blue and teal paints match the Damaged Dots paper.

To finish the tag, I added some twine at the top and pearl stickers to the centre of all the smaller flowers.  I watered down some of the gesso and flicked it on with an old brush.  Then I thought it needed something else and my husband actually suggested the feathers.  Usually he just rolls his eyes and shrugs his shoulders when I ask for his opinion so needless to say, I was happy that he had something to say this time.

I love this tag and hope I have inspired you to dig out your papers and paints and create.  Happy Spring!

Saturday, 25 March 2017

Breathe! It's Spring!

Hello Everyone and Welcome!

Today Ksenija is here, and I am happy to share with you a new project as a part of March inspiration from International DT.


I am featuring Live Laugh Love stamp set in combination with other IndigoBlu stamps and products.


I started with stamping this gorgeous flower from Live Laugh Love set in scarlet dye ink and repeatedly in embossing ink. To make dye ink watercolour resistant I covered the image with fine clear embossing powder and heat set it.


I added light colouring to the flower with watercolour markers. To create a soft shading around the image I masked off the flower with masking paper and blended in Distress ink in Salty Ocean. Then I stamped a dotted splatter image from Butterfly Collector set using FlitterGlu and covered the impression with one of my favourite Megaflakes - Chariot of Fire
At the end I stamped down Breathe from Plume set in black ink and mounted the panel to scarlet card base.

Thanks so much for stopping by! I hope, you enjoy this card and you will play with IndigoBlu flower sets during this weekend.

IndigoBlu Supplies Used:
Live Laugh Love Stamp Set
Butterfly Collector Stamp Set
Plume Stamp Set
FlitterGlu
Chariot of Fire Megaflakes

Thursday, 23 March 2017

Spring Mixed Media layout

Hello everyone!! It's Solange Marques here again!
Today I'll share with you a new project using the wonderful IndigoBlu products!
The month theme is Spring, then I prepared a Spring layout with a lot of flowers and butterflies!


I used the collections: Floral Fantasy and Damage Damask Mixed Media Paper pads12x12.
I've stamped some daisies using Blooming Great  A5 stamp, and I've used IndigoBlu English Cottage Artist's Acrylic paints : Banana Custard, Lemon Meringue, Frosty Sky and Hot Cocoa.


On the background I've used Honeycomb Background A6 stamp :


I've applied Lancashire Rose MegaFlakes on the chipboard using Flitterglu:


I hope you enjoy it!


Monday, 20 March 2017

Inspiration from International Design Team Members Cec, Giovanna and Ksenija

Fancy a little more inspiration from our International Design Team, then head over to their blogs for the full step by step details for their projects.


Sunday, 19 March 2017

Saturday, 18 March 2017

Thursday, 16 March 2017

Easter Egg


Hello, It's Kay M here today with my spring project, a decorated egg which are a wonderful celebration of the season.   I have decorated a papermache two part egg shaped box, just perfect to house a chocolate egg!

A number of leaf sprigs were die cut and applied all over the outer surface using the Slap-it-On Matt  then GeeSsoGood white was painted both on the outside, and inside of the egg, then left to dry.    
I painted the inside with Lime Marmalade for a bright pop of colour.


The outside was painted first with Peppermint Tea and dried.  Then I applied Olive Waistcoat over the leaf shapes with a paint brush and removed excess with kitchen towel so the paint was removed from the raised areas.  LimeMarmalade was then dry brushed over, this gave a lovely textured appearance to the egg.


A sentiment from Victorian Garden was stamped in black ink and heat embossed with clear powder onto white card, cut out and edged in black ink and adhered to the egg.

The flower sprig from the Clock Work Stamp Set was repeatedly stamped in black ink and heat embossed with clear powder onto white card.  They were then painted with Mulberry Bush and Lemon Meringue paints and after the flowers had been fussy cut, they were glued onto the leaf shapes.


The Bee from Victorian Garden was repeatedly stamped in black ink and heat embossed with clear powder onto heat resistant acetate.   Lemon Meringue paint was painted over the bodies and left to dry.   The Bee's were then fussy cut and attached to the egg.
I finished by adding a chocolate egg!


I do hope you have enjoyed my project and are inspired for you Easter makes.


Kay M. 

Tuesday, 14 March 2017

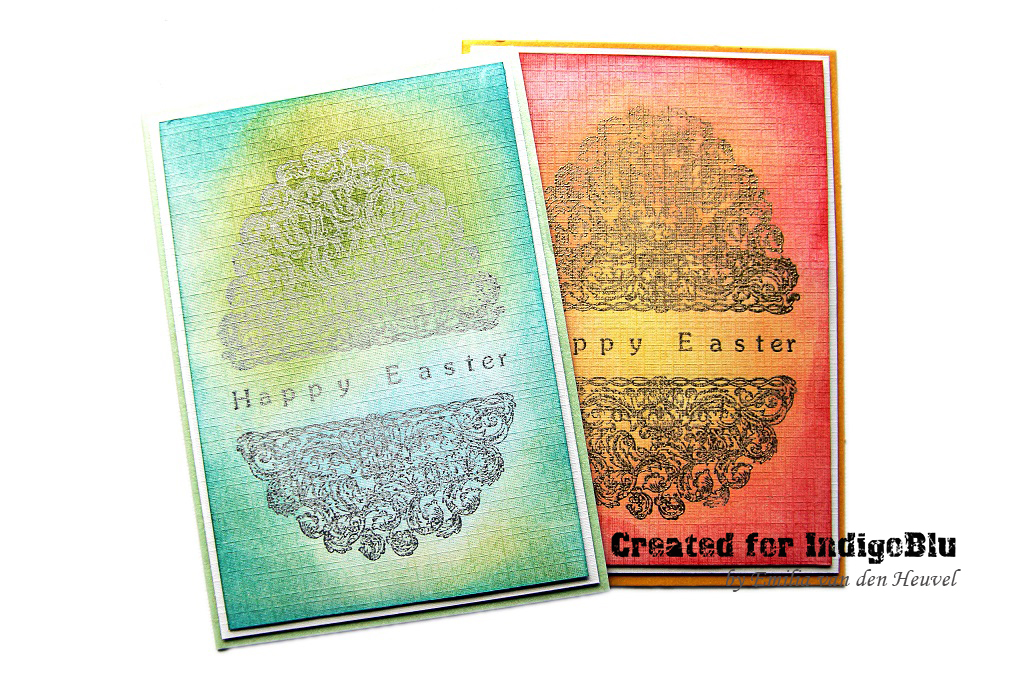
Gilded Easter Egg cards with Emmy

Hello IndigoBlu fans!

Emmy here with my first project for March. This month the focus on IndigoBlu blog is on Spring. And what is the best thing about Spring, beside the flowers - Easter of course. So, I've prepared two quick and charming Easter cards to share with you using Indigoblu Easter Egg A6 Red Rubber Stamp and a lot of different colours distress ink pads.


To create these cards I heat embossed the image using Indigoblu Easter Egg A6 Red Rubber Stamp and gold/silver embossing powder. Once the image has cooled down I used two sets of Tim Holtz Distress ink pads to colour my Easter eggs.


I hope you enjoyed today's post!

Have a wonderful creative weekend!

Emmy