Showing posts with label Elizabeth Robinson. Show all posts
Wednesday, 18 October 2017
Friday, 6 October 2017
Oscar's Wild Poppy Couture
Hi there Elizabeth here with another new project to share with you.
I absolutely love decorating the Mannequins we have at IndigoBlu. I start by fitting the base together, before giving that and the body a coat of White GeeSsoGood.
Aha and what's this donut shapes piece of white wax paper for.............well I know what I'm going to use it for it's a ready made skirt!
Given a quick coat of Peppermint Tea Cottage Garden paint to create a little tooth, I stamped over two of these using the new Wild Poppy stamp set and Black GeeSsoGood.
The stamped images weren't crisp as it was a wax surface that had been scrunched up, but I really loved the effect, and so added the branches in the same way.
I diluted Stroke of Midnight and brushed the colour over the top of the flowers, this really reminds me of the beautiful almost distressed floral fabrics from the 50's.
I decided which one would be my bottom layer of the skirt, and gave it a little scrunch before adding it to the Mannequin.
Then I added a few black sequins to the flower centres on what would be the top layer of the skirt, well you know me and sequins by now, I just can't resist.
I created a bodice with black satin ribbon and lace, to compliment the black sequins, and gave her a choker of beautiful crocheted thread with sequins.
Sat upon the top of the body is a beautiful cystal knob, which catches the light.
So there you have my homage to Oscar De La Renta and a bygone time of stunning couture cocktail dresses.
Happy Crafting.
Elizabeth x
Monday, 18 September 2017
Wednesday, 6 September 2017
Friendship
Good morning and welcome from Elizabeth with the first of the posts from the new International Design Team for 2017/18.
I absolutely adore the new Big Butterfly #2 and combined with the new A6 Peony it's just perfect.
I started by making a master board using Coastal Walk, Marshmallow, Olive Waistcoat and Lime Marmalade Cottage Garden Paints
I stamped out the Butterfly once, and the Peony and Ferns a couple of times in Black Versafine. Then heat embossed them using a fine detail clear embossing powder. After they had cooled, I cut out all the elements.
I then diluted some of the gorgeous Blue Luscious Powder and brushed over the top of the Ferns, the Butterfly wings and to create shadows on the Peony's.
Once the Luscious had dried it was just a case of creating a design with the pieces onto a C5 card blank that had been covered with a piece of vintage music paper.
I added glitter to the centre of the Peony's, splashes of diluted Blue Luscious and of course I can't resist a few sequins.
I hope you enjoyed the process and have found a little inspiration.
Elizabeth x
Friday, 1 September 2017
Welcome to IndigoBlu's Internation Design Team 2017/18
I am so very excited and proud to introduce you to the International Design Team for 2017/18. There are some familiar faces in the the line up, along with some new ones. All of whom are fabulously talented and I can't wait for them to start sharing their artwork with you.
I am very proud to be the International Design Team Lead again this year, and would like to thank both Kay and Alfie for putting their trust in me to carry out this job.
So here and in no particular order is our fabulous team.
I am very proud to be the International Design Team Lead again this year, and would like to thank both Kay and Alfie for putting their trust in me to carry out this job.
So here and in no particular order is our fabulous team.
Elizabeth Robinson
Jannet Blay
Cheremane Smith
Mike Deakin
Lydia Boode
Carolyn Lakin
Kay Molyneaux
Ksenija Rizova
Thursday, 18 May 2017
Thursday, 6 April 2017
Dreams Come True
Good morning it's Elizabeth here today and I have a little story to share with you. So are you sitting comfortably, then we will begin............
Many years ago there was a little girl who would spend hours with a small box of watercolours and a book of images. She would take her time colouring in the pictures, blending the paints to create Rainbows of colour. One day afternoon she lay in the grass painting in her beloved book, at 4pm her Nana called her in for tea. They ate Cheshire Cheese and sliced apples, along with home made scones, it was a delicious meal. The child then headed off to the garden, but alas the rain had started and her beloved book was soaked through. The tears streamed down her face as she headed indoors. "Don't worry" said her Nana, "we will place the book on the kitchen table and it will dry overnight"
The little girl had such awful dreams that night about her precious book. But when she awoke the next morning, waiting on the kitchen table was the book. The colours had run and blended together when the rain had hit them, making them look like the most beautiful rainbow she had ever seen........
And I've loved water colouring ever since....................
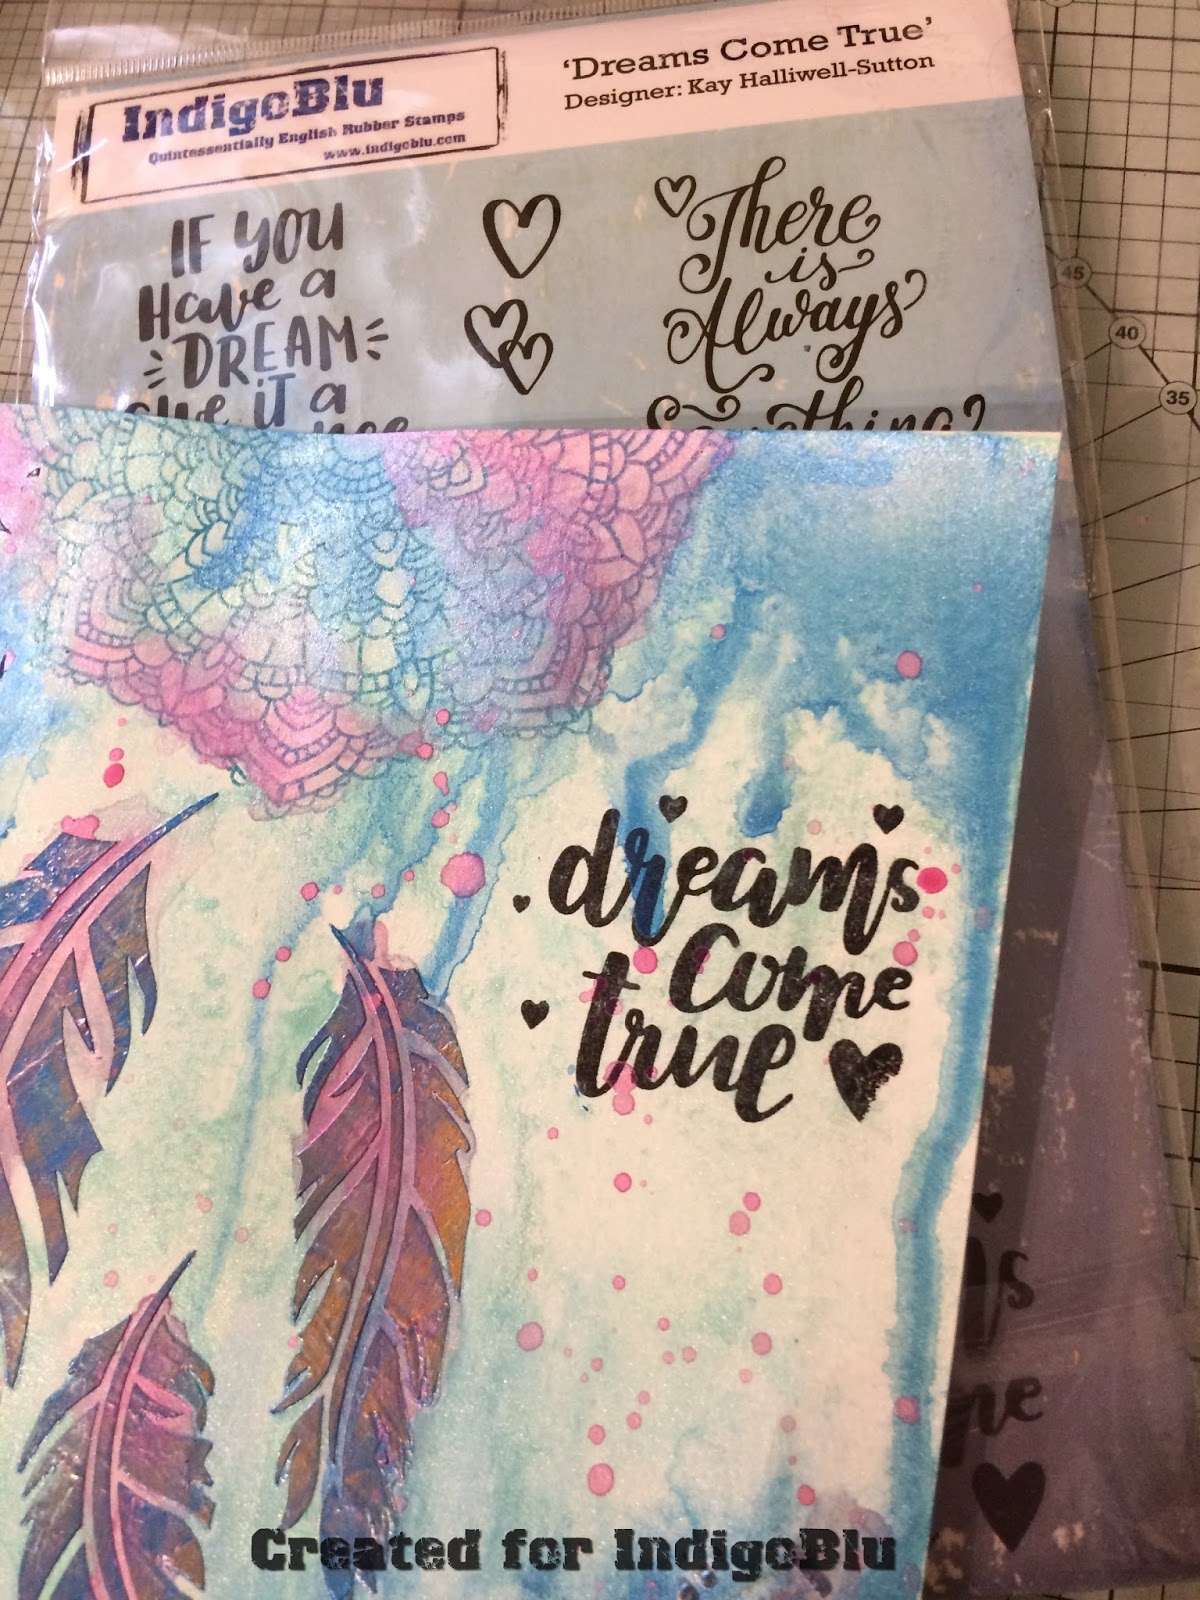
Working on a page from my Junk and Disorderly Journal, I stamped out the half doily from the Floral Fantasy Stamp Set using Teal Blue Stazon ink to create the top of my Dreamcatcher.
The Feather Stencil is perfect for the feathers of a Dreamcatcher.
I mixed a selection of Luscious Powders into some of the Super Thick Slap It On to create my own bespoke shade of Embossing Paste. I stencilled the feathers underneath the doily, and also added some texture to the page using one of the new Dinkie Stencils. That's also a great way of using up any left over paste on your craft mat.
Next I diluted some of the beautiful Green Luscious, and roughly painted all over the page, and give it a gentle spritz of water to make the pigment flow, for a watercolour effect.
After the green had dried I then went back over the top adding in some of the stunning blue powder, allowing drips to run down the page, and pools to form at the bottom corner. The sheen from the mica is just beautiful.
No watery rainbow would be complete without a little pink shining through. So that's what I added, dilute with a brush and also by adding a few splatters. I left the page to dry naturally, as I wanted the full shine from the mica powders, heat setting burns off some of the beautiful sheen.
One of the newest stamp sets at IndigoBlu is this Dreams Come True set, so new it's not on the website just yet.........I chose one of the fabulous sentiments, and added it using Black Versafine ink directly to the page.
To finish off and bring the colours together, I added a few black splatters using diluted Black GeeSsoGood and of course, sequins............for a little extra sparkle!
Have a great day, and I will see you soon.
Elizabeth x
Saturday, 18 March 2017
Monday, 6 March 2017
Waiting for Mr Darcy.....
Hi there it's Elizabeth here with another page from my Junk and Disorderly Journal. Jane is daydreaming of Mr Darcy with thoughts flying around her head like birds.
I started by stamping the lace from the Mr Darcy Stamp Set across the bottom of a Bockingford tag, using Versamark ink, Wow fine black embossing powder, and heating it. Once cool I trimmed across the edge to create a scalloped finish.
I carried on adding more stamping and built up a design using Jane and also the birds. These were also embossed.
I coloured Jane and the rest of the tag, using a selection of the gorgeous Luscious Powders leaving each colour to dry completely before adding another, otherwise the colours would blend together like watercolours.
Whilst the tag was on one sie drying out, I stamped out a background using the Lace stamp, this time using a black Versafine ink. I added splatters of Cinderella Metallic paint, and created a shelf for the tag to sit on using a piece of bright pink Sari Silk.
I added more of the same Pink Sari Silk to the tag, before adding it onto the journal page.
To finish off the page I added more birds, die cut from a Tim Holtz strip die.
So Jane sitting pretty in her pink silk gown is dreaming of Mr Darcy, his velvet brown eyes, broad shoulders and handsome good looks, will he call on her, I wonder..................
Elizabeth x
Subscribe to:
Posts (Atom)