Showing posts with label Marigold and Peony. Show all posts

Friday, 11 May 2018

Oriental Style All Occasion Card with Mike Deakin


Hi Guys,

It's my turn to share a quick card project with you today, so I've created an oriental style 6x6 all occasion card using a few IndigoBlu products as follows:


I made a quick video of the process from start to finish so you could see exactly how I made the card and stamped the peony image using the Goldfinger paint. Click below to watch.

Don't forget to like and subscribe to the IndigoBlu YouTube channel for more video projects from the other members of the Design Team.


Thursday, 19 April 2018

Stamp Focus | Building A Wreath with Marigold And Peony

Today Ksenija is here and I am sharing a wreath card made with Marigold and Peony red rubber stamps set.
How to make a floral wreath card with individual stamps
Marigold and Peony stamps set is a part of the recent release from IndigoBlu and is perfect for making floral cards.

This set contains four individual stamps which are easy to use for building various floral designs. I would like to explain how to easily stamp a perfectly aligned floral wreath.
Building A Wreath with Individual Stamps
To stamp a symmetrical wreath of flowers you will need a square piece of a card stock, a stamp positioning tool, e.g. MISTI, and a masking paper.

How To Make This Card:


  • Place a square piece of a card stock in your stamp positioning tool in the lower left corner and position a flower stamp also in the lower left corner.
  • Stamp the flower down onto a paper in black watercolour friendly ink.
  • Rotate the card panel by 90 degrees counterclockwise and stamp the flower again.
  • Repeat this step twice and you will get four flowers stamped in each corner of the card panel aligned perfectly.
  • Stamp down the flower onto a piece of a masking paper twice and fussy cut out two masks.
  • Mask off two flowers onto a panel with the paper masks and place the panel into your stamp positioning tool.
  • Position a flower stamp between two masked off flower impressions and stamp it down onto the panel.
  • Reposition one of the masks to the third flower and rotate the panel within the stamping tool by 90 degrees counterclockwise and stamp the flower between two masked off flowers.
  • Repeat this step twice to get the full wreath of flowers.
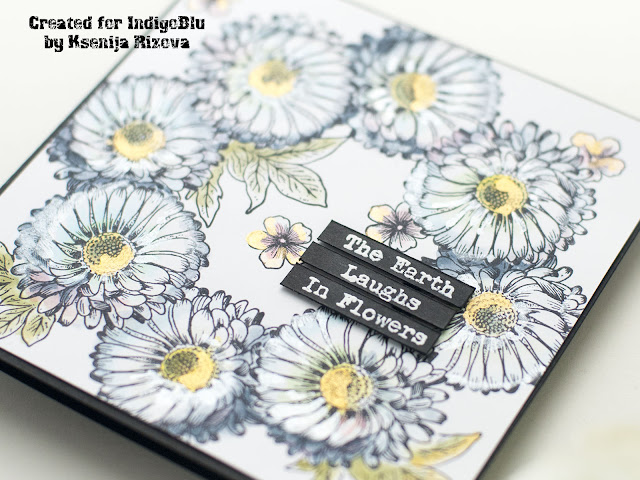
Add shiny accents with IndigoBlu Luscious Pigment Powders
Masking is a great technique for adding details without paper layers. I replaced the masks several times and added leaves and smaller flowers impressions.

I coloured the wreath with watercolour markers and added accents with water diluted Luscious Pigment Powders in Gold and Silver.

To finish off my card I heat embossed the phrase from Floral Fantasy stamps set in fine white powder onto a piece of a black card stock and cut it into three thin stripes.

To assemble the card I adhered the stamped panel to a black card base and popped the sentiment stripes up with a foam tape.

Thank you for stopping by and have a great day!
IndigoBlu Supplies Used:
Marigold And Peony Red Rubber Stamps Set
Floral Fantasy Red Rubber Stamps Set
Gold Luscious Pigment Powder
Silver Luscious Pigment Powders

Saturday, 13 January 2018

Hello


Cheremane here with you today with my first project for 2018.  I've used one of my favourites for today's creation I adore the Florals.

Firstly I stamped the Peony and Leaves with Black Versafine and heat embossed with clear powder onto watercolour card.

I wet the cardstock before adding tiny amounts of Mulberry Bush and Hunter Green which I had mixed with water too as it adds more of a watercolour feel to you image,


Then I stamped and heat embossed the Hello sentiment from Dreams Come True and added the border from the super Aztec Borders set which was realeased on Hochanda just before Christmas.

I mat and layered using coal black stamping card and when the peony and leaves were dry layered them with glue gel to finish.

Be sure to check back again soon for lots more inspiration from the team.
Crafty Hugs 
Cheremane x

Monday, 16 October 2017

Flower Tag


Hello and welcome, it's Kay M here with today's post.    I've made a simple tag with the fabulous new floral stamps the Kay recently introduced and have highlighted a few blooms with autumnal colours with Luscious powders.


I painted a grey board tag with black Gee-Sso-Good to get a lovely flat matt background.  This was to compliment the texture of Floral Power stamped in Versafine and heat embossed in clear embossing powder as shown.


Flowers from Wild Poppy, Marigold and Peony and Anemone and Daisy sets were stamped onto white card in Versafine black and embossed in clear embossing powder.   They were then painted with Red, Orange, Rose Bronze and Gold Luscious powders, fussy cut and the raw edges coloured with black pen.  An extra area of card was painted with the same colours, to create a masterboard, and when dry the sentiment from Pegasus was stamped in black and heat embossed in clear embossing powder and cut out.  Repeating the heat embossing process gives unity to the whole project.     


To finish, red and orange Luscious were used to colour some shear ribbon lengths and when dry these were tied to the tag.  The sentiment and flowers were then attached as shown.


The same technique could also be used to make a card for an autumn celebration.   I hope you have been inspired!


Take care,  Kay M