Showing posts with label Coastal Walk. Show all posts

Thursday, 7 June 2018

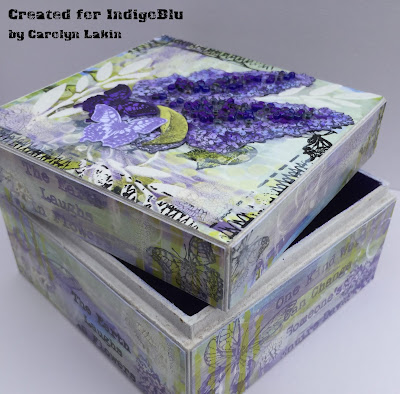
Floral Fantasy Box


Good Morning,

Hope you're all enjoying the good weather we've being having recently. 

Today I'm sharing a project I made some time ago using the Fantasy Floral stamps. The Buddleia is a gorgeous flower that attracts butterflies and this is why it's commonly known as the Butterfly Bush. 


Materials

MDF box
Indigoblu Stamps - Floral Fantasy, Rugged Edge
Stazon Black & Vibrant Violet
IndigoBlu acrylic paint - Lime Marmalade, Coastal Walk, Wimberry Pie, Aladdin 
IndigoBlu Stencils - Laurel Leaves & Texture
IndigoBlu White Gesso
IndigoBlu fine paste
IndigoBlu Slap-it-on Gloss
IndigoBlu Diamond glaze
IndigoBlu stamping card
Seed beads


Divide an A4 card into 4 sections to create the background for the sides of the box and paint with the
Lime Marmalade, Coastal Walk and Wimberry Pie. 


Apply white Gesso with a palette knife to create texture and lines and add Lime Marmalade through the Texture stencil. 


Stamp the butterflies and the lilac flower in Violet and Black. Create circles using the top of a water mister bottle dipped in white Gesso. Cut each section into 92mmx36mm for the box side and 92mmx19mm for the lid side.


Create another background (94mmx94mm) for the lid of the box using the same colours as before and stamp the lilac flower in Black. Stamp an additional flower using Wimberry Pie, cut out and decoupage the main image. Apply fine paste through the leaves and circle Texture stencil. 


Use Slap It On to adhere beads randomly to the lilac flower. Stamp a border to the lid background with the Rugged Edge Stamp. Stamp two small butterflies one in Violet and the other Black and paint with Wimberry Pie and Aladdin. Cut out and adhere to the box lid.


Using Slap It On adhere all the backgrounds to the sides of the box and lid. Randomly apply Korma Crackle. Once its dry paint the inside of the box with Aladdin and stamp a butterfly using white Gesso to the inside of the base and lid. Finally apply Diamond Glaze to the top of the box to encase the beads and give it a gloss finish.


Thank you for stopping by and please do leave a comment. It's great to hear from you.

Happy Crafting

Carolyn
x


Wednesday, 11 April 2018

Mixed Media Art Journal Page Inspiration with Mike Deakin

Hi Everyone,

It's my turn to share some inspiration with you today and I thought I'd create a whimsical mixed media art journal page using the new Collectors Edition No15 Stamp "Dorking Hen" and a few other fab IndigoBlu products (listed below)

When I saw the Dorking Hen I immediately thought of at least 6 ways to use the stamp, but all tongue in cheek!

Here's just one of them.


To watch a video on how I created the art journal page above, simply click the YouTube link below:

Here's a list of all the IndigoBlu products used in this projects
Watercolour Card Stock

Whatever you do today, make sure it's a creative one!


Wednesday, 6 September 2017

Friendship


Good morning and welcome from Elizabeth with the first of the posts from the new International Design Team for 2017/18.

I absolutely adore the new Big Butterfly #2 and combined with the new A6 Peony  it's just perfect.


I started by making a master board using Coastal Walk, Marshmallow, Olive Waistcoat and Lime Marmalade Cottage Garden Paints 


I stamped out the Butterfly once, and the Peony and Ferns a couple of times in Black Versafine. Then heat embossed them using a fine detail clear embossing powder. After they had cooled, I cut out all the elements.


I then diluted some of the gorgeous Blue Luscious Powder and brushed over the top of the Ferns, the Butterfly wings and to create shadows on the Peony's.


Once the Luscious had dried it was just a case of creating a design with the pieces onto a C5 card blank that had been covered with a piece of vintage music paper.


I added glitter to the centre of the Peony's, splashes of diluted Blue Luscious and of course I can't resist a few sequins.


I hope you enjoyed the process and have found a little inspiration.

Elizabeth x

Sunday, 26 March 2017

Spring Tag


It is Cec here and today I am bringing you a spring tag that I created.


I am very, very fortunate that my husband has a laser cutter in the basement (it was his retirement present to himself) so he can cut me pretty well anything I want.  I don't like that normal manilla tags warp when you add lots of wet media so I got him to cut me a 4" x 8" tag from mat board.  The first thing I did to it was give it a border with Hot Cocoa Acrylic Paint because I intended to add a second layer.


I also had my husband cut a second tag from heavy card stock that was 1/4" smaller all the way around to use as a second layer.  I used some texture paste and the IndigoBlu Texture stencil to add some dimension.


Next I used some Slap it On Matte to add a few clusters of seed beads that I picked up from the dollar store.


I used some Martha Stewart Crafter's Clay and a Prima Mold to make a florish.  When it was dry I cut it in half and added it to my top layer using Super Thick Slap it On to ensure that it would not fall off.


I added a coat of Gee-Sso Good White gesso over the top of this layer and then sponged on Townhouse Teal, Coastal Walk and Hot Cocoa Acrylic Paint.  it was brighter than I wanted so I sponged a bit of the gesso on over the paint to knock it back a bit.


Then I decided to add a few spray inks - Tim Holtz Gathered Twigs and Lindy's Frozen Jack Frost but it didn't turn out as I expected.  I have a love/hate relationship with spray bottles and usually they won't spray when I want them to but this time the Tim Holtz bottle sprayed way too much.  I grumbled a bit and then started sponging the paint colours back over all the brown.  I also stamped some script from the IndigoBlu Tasty Textures set with some Coffee Archival Ink.


Next I used the Coffee Archival Ink to stamp a couple of flowers from the Live, Laugh, Love set on pale yellow card stock, fussy cut them and shaped them with a large embossing tool.  I used a sponge to add some gesso to the edges of the flowers and then mounted one on top of the other.


I also used a punch from EK Success to punch a bunch of little flowers from some of the 12" x 12" Damaged Dots paper.  I went back and cut a batch of even smaller flowers just to mix things up a bit.  Then I shaped them and added a bit of gesso to the edges.  When you see these little flowers on the finished tag take note of how well the blue and teal paints match the Damaged Dots paper.

To finish the tag, I added some twine at the top and pearl stickers to the centre of all the smaller flowers.  I watered down some of the gesso and flicked it on with an old brush.  Then I thought it needed something else and my husband actually suggested the feathers.  Usually he just rolls his eyes and shrugs his shoulders when I ask for his opinion so needless to say, I was happy that he had something to say this time.

I love this tag and hope I have inspired you to dig out your papers and paints and create.  Happy Spring!