Pages
▼
Monday, 26 September 2016
Santa Ornament
It is Cec here and today I am bring you a little more Christmas in the form of an ornament.
This ornament starts with an old DVD. I got my husband to drill a single hole at the top to accommodate a hanger and three holes at the bottom just in case. Next I cut some scalloped circles on my Cameo to cover it. I was decorating both sides of the DVD so I cut two circles larger than the DVD and two the same size.
The next step was to paint the circles. I had one plan in mind and painted randomly on one side of each circle with Ruby Slippers, Goldfinger and Emerald City Metallic Paint and then I wiped it back a bit with a baby wipe. It didn't turn out the way I wanted it to - you can see the result when you look at the centre of the larger circle. Instead of sending it to the circular file marked "G", I decided to cover it with slightly watered down Ruby Slippers. I liked the look then. Since the smaller circle was going to be mounted on top of the larger circle, I didn't waste any more paint by going all the way to the centre of the larger circle.
The next step was to stamp the smaller circles with the IndigoBlu Script Background stamp and Jet Black Archival Ink. This is rapidly becoming a favourite stamp.
I crumpled up some white tissue paper into a tight ball and then opened it back out again and glued it to the smaller circles using some Matte Slap it On. Once it was dry, I trimmed away the excess tissue. If you don't wait until it is dry, the tissue will disintegrate in your hand. If you use a plain scallop rather than a double scallop like I did, it will be even easier to trim.
I forgot to take a photo of this next step but I covered the tissue with some watered down Goldfinger Metallic Paint and then inked the edges with some Red Geranium Archival Ink. I also mixed some Silver Luscious with water and pounced it on randomly using a stencil brush.
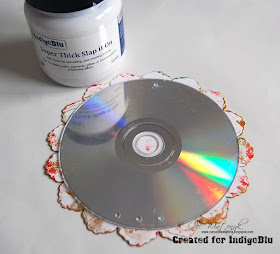
I covered the DVD next by adhering the DVD to the back of one large circle using Super Thick Slap it On. This is a fairly fast grab so you have to work a bit quickly but of all the fabulous things it does, it is a terrific adhesive. Once dry, I made a hole through the circle where the single hole was drilled in the DVD. I decided not to use the bottom holes this time.
I glued the second circle on the other side of the DVD and held it in place with paper clips until dry. Then I made the hole at the top on this side and touched up the edges of the hole on each side with a bit of paint. It is much easier to locate your hole by doing it one step at a time as I have than trying to find where it goes if you have everything covered.
While I could still see my hole, I added some narrow red satin ribbon to make a hanger.
I stamped two copies of the Santa head from the Retro Christmas set using Jet Black Archival Ink and fussy cut them.
I coloured my Santas using Prismacolors for the face, hat and beard. I added a little bit of Silver Luscious to the beard and used a Snow Marker from Uchida to make the fur on the hat. This goes on like a white marker and then you use your heat gun to puff it up.
For final assembly, I added fun foam with double sided adhesive to the smaller circle and popped it up on top of the larger circle on each side. Then I repeated this process with the Santas and added them on top of the smaller circle. Finally I added some red gems for a bit of bling.
I hope you are inspired to dig out an old DVD or CD and transform it into a new ornament for your tree with one of the many fabulous Christmas stamps from IndigoBlu - new or old.


gorgeous santa - really lovely project Cec xx
ReplyDelete